Designer: LikeALigerCrochet
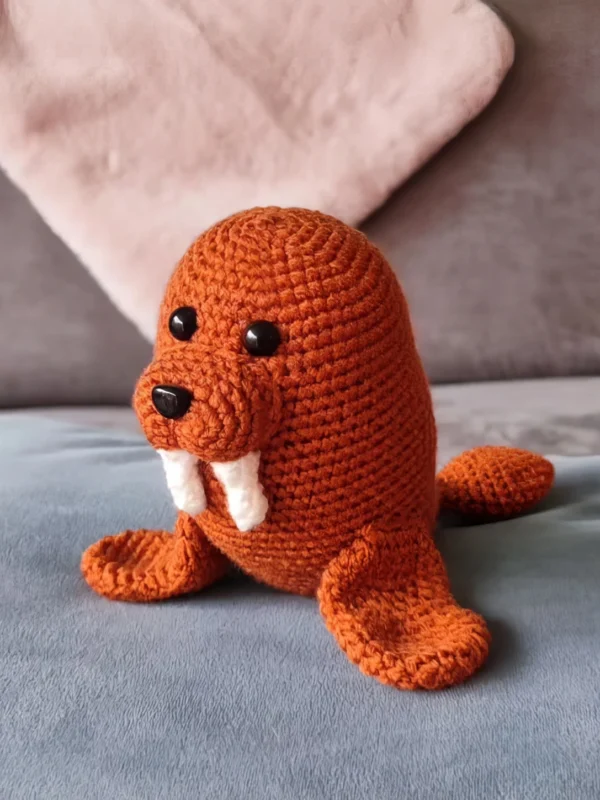
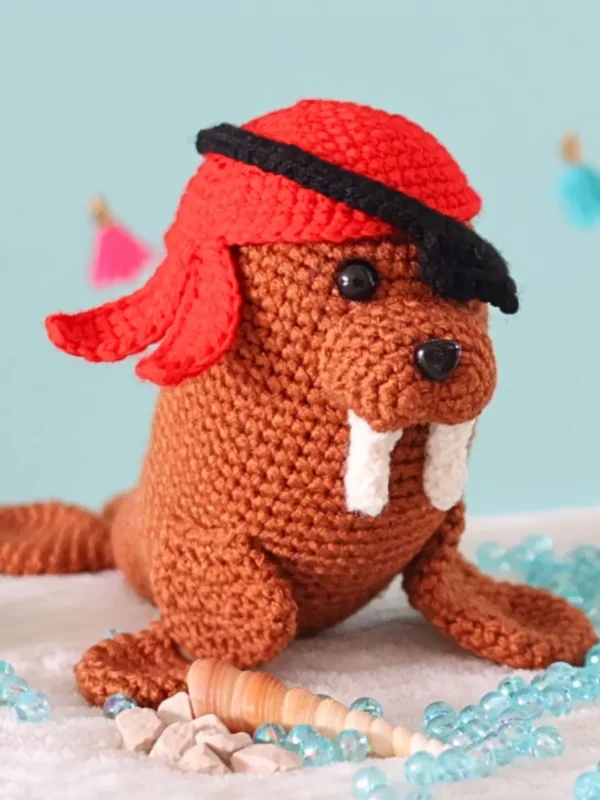
Captain Tusk is a charming crochet character full of personality and adventure. This amigurumi creation captures the spirit of a fearless explorer ready to set sail on new journeys.
This tutorial has detailed instructions on how to make the head, body, snout, front flipper, tusk, tail flipper, eye patch, pandana, and how to assemble all parts. You’ll need worsted-weight yarn in warm brown, white, red, and black shades, two safety eyes, fiberfill, a 2-3 mm crochet hook, a stitch marker, and a tapestry needle.
This pattern is made in continuous rounds, so use a stitch marker to mark the first stitch of each new round to keep track of where you are.
The final measurements for Captain Tusk are 10.5 cm (4.1”) using cotton yarn, and you can make it in a different size if you use bulkier yarn with a suitable hook.
Plant him on your desk to intimidate coworkers, add him to a nautical or ocean-themed collection or gift him to the pirate-obsessed person. He commands every shelf he sits on and demands immediate respect.
Materials
- Yarn in light brown, red, black and white colors
- 2 mm crochet hook (for cotton) / 3 mm crochet hook (for acrylic)
- 6 mm safety eyes
- Fiberfill
- Stitch markers
- Yarn needle
- Pins
- Scissors
Size: 10,5 cm tall on cotton yarn and 13,5 cm tall in medium weight acrylic yarn
Abbreviations
Mr – magic ring
sl st – slip stitch
ch – chain
sc – single crochet
dc – double crochet
hdc – half double crochet
tr – triple crochet
inc – increase
dec – decrease
Pattern worked in continuous spirals, not in joined rounds.
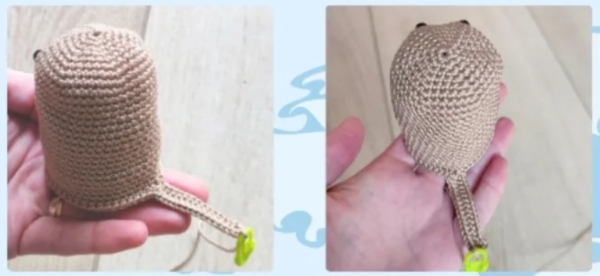
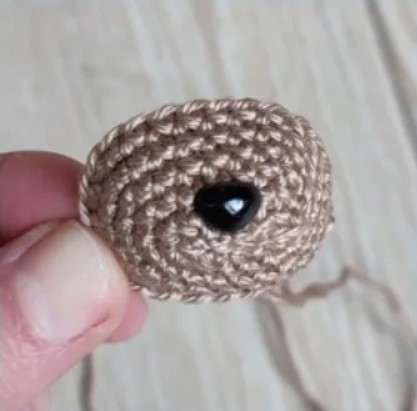
Head & Body
Use brown yarn.
Rnd 1: 6 sc in Mr (6)
Rnd 2: inc x 6 (12)
Rnd 3: (1 sc, inc) x 6 (18)
Rnd 4: (2 sc, inc) x 6 (24)
Rnd 5: (3 sc, inc) x 6 (30)
Rnd 6: (4 sc, inc) x 6 (36)
Rnd 7: (5 sc, inc) x 6 (42)
Rnd 8: (6 sc, inc) x 6 (48)
Rnd 9-26: 48 sc (48) (18 rounds)
You’re now going to crochet the backbone of the body.
Ch 16, then start in the second st from the hook (this is also the new start of rnd 27!):
Rnd 27: inc, 14 sc down the chain, sl st in the same st as where the chain started (do not count this as a stitch), 23 sc, dec, 23 sc, 14 sc down the other side of the chain, inc (79)
Rnd 28: 16 sc (skip the sl st of rnd 27), dec, 20 sc, dec x 2, 20 sc, dec, 15 sc (75)
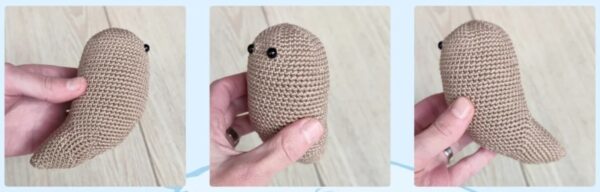
Now that you can see which side of the face is the front, you can place the eyes between rnd 8 and 10, with 5 visible st in between. Stuff the head firmly and keep stuffing as you go.
Rnd 29: 16 sc, dec, 15 sc, dec, 6 sc, dec, 15 sc, dec, 15 sc (71)
Rnd 30: dec x 2, 27 sc, dec, 8 sc, dec, 28 sc (67)
Rnd 31: dec, 12 sc, dec, 16 sc, dec, 17 sc, dec, 12 sc, dec (62)
Rnd 32: 12 sc, dec, 34 sc, dec, 12 sc (60)
Rnd 33: (8 sc, dec) x 6 (54)
Rnd 34: (7 sc, dec) x 6 (48)
Rnd 35: (6 sc, dec) x 6 (42)
Rnd 36: (5 sc, dec) x 6 (36)
Rnd 37: (4 sc, dec) x 6 (30)
Rnd 38: (3 sc, dec) x 6 (24)
Rnd 39: (2 sc, dec) x 6 (18)
Rnd 40: (1 sc, dec) x 6 (12)
Close the hole by working your yarn tail through all front loops of the last round with a yarn needle.
Fasten off and weave in the yarn end.
Snout
Use brown yarn.
Ch 5, then start in the second st from the hook:
Rnd 1: inc, 2 sc, inc, continue on the other side of the chain, inc, 2 sc, inc (12)
Rnd 2: inc, 4 sc, inc x 2, 4 sc, inc (16)
Rnd 3: inc, 6 sc, inc x 2, 6 sc, inc (20)
Rnd 4: inc, 8 sc, inc x 2, 8 sc, inc (24)
Rnd 5: inc, 10 sc, inc x 2, 10 sc, inc (28)
Rnd 6: dec, 10 sc, dec x 2, 10 sc, dec (24)
Sl st, fasten off.
If you’re using a safety nose, place it between rnd 1 and 2.
The snout is stuffed while sewing it on.
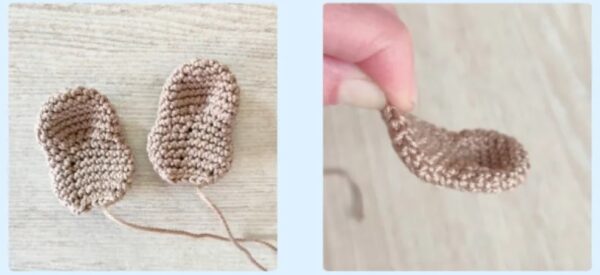
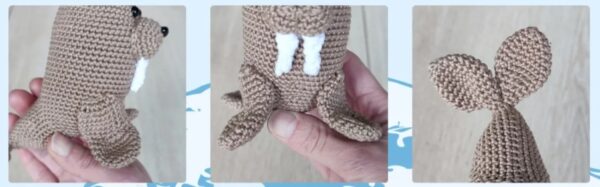
Front Flipper x2
Use brown yarn.
Rnd 1: 6 sc in Mr (6)
Rnd 2: inc x 6 (12)
Rnd 3: (1 sc, inc) x 6 (18)
Rnd 4: 18 sc (18)
Rnd 5: (2 sc, inc) x 6 (24)
Rnd 6-8: 24 sc (24) (3 rounds)
Rnd 9: dec x 6, (sc, inc) x 6 (24)
Rnd 10: dec x 4, (sc, inc) x 6, dec x 2 (24)
Rnd 11-12: 24 sc (24) (2 rounds)
Rnd 13: 10 sc, (2 sc, dec) x 3, 2 sc (21)
Rnd 14: 10 sc, (sc, dec) x 3, 2 sc (18)
Rnd 15: (1 sc, dec) x 6 (12)
The flippers don’t need to be stuffed, you may need to stuff them lightly if you’re working with a soft yarn type. The walris needs the flippers to sit upright.
Fold the sides together and close by working 6 sc through both sides (6)
Leave a long tail. The flippers are later sewn onto the body.
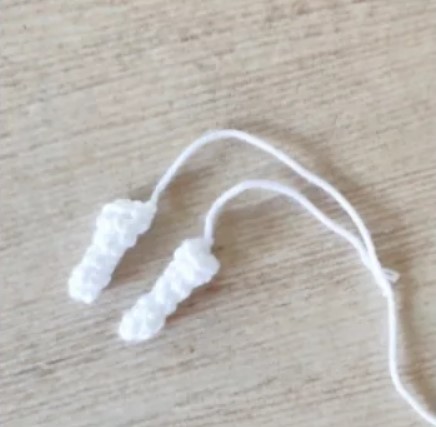
Tusk x2
Use white yarn.
Rnd 1: 4 sc in a Mr (4)
Rnd 2-4: 4 sc (4) (3 rounds)
Rnd 5: inc, 3 sc (5)
Rnd 6: inc, 4 sc (6)
Sl st, fasten off. Leave a long tail.
The tusks don’t need to be stuffed. You can stuff them lightly if you work with a soft and heavy yarn type.
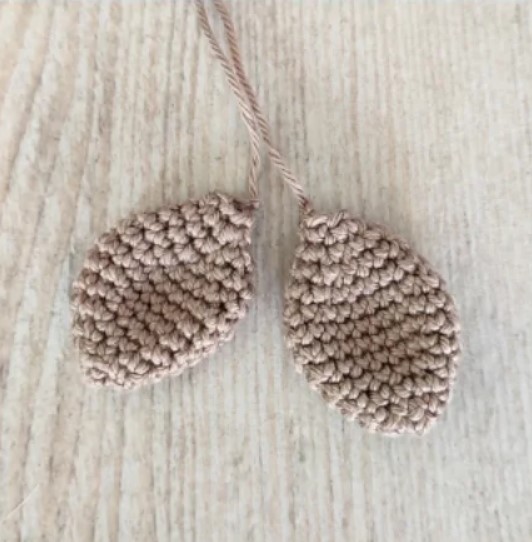
Tail Flipper x2
Use brown yarn.
Rnd 1: 6 sc in a Mr (6)
Rnd 2: (1 sc, inc) x 3 (9)
Rnd 3: (2 sc, inc) x 3 (12)
Rnd 4: (3 sc, inc) x 3 (15)
Rnd 5: (4 sc, inc) x 3 (18)
Rnd 6: (5 sc, inc) x 3 (21)
Rnd 7: 21 sc (21)
Rnd 8: (5 sc, dec) x 3 (18)
Rnd 9: (4 sc, dec) x 3 (15)
Rnd 10: (3 sc, dec) x 3 (12)
Rnd 11: (2 sc, dec) x 3 (9)
Rnd 12: (1 sc, dec) x 3 (6)
Sl st, fasten off. Leave a long tail.
The tail flippers don’t need to be stuffed. The are later sewn onto the back of the body.
Eye Patch
Use black yarn.
Ch 59, then start at the 2nd st from the hook. (Measure the length by placing your chain around the walrus head. You may need to adjust the number of stitches):
Row 1: 58 sc (58)
Close to a ring by sewing, then fasten off and weave in the yarn end.
For the eye patch, pull up a new loop though one of the stitches of row 1 (make sure the part where the two ends are attached to each other sits in the back).
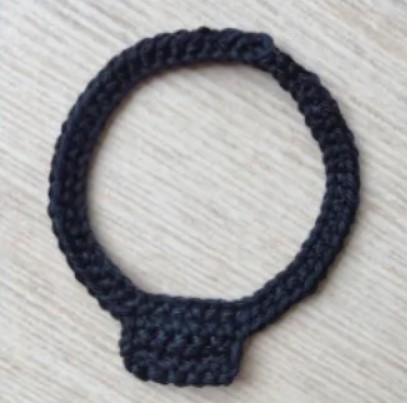
The eye patch is crocheted onto the “band”, in rows:
Row 2-3: 7 sc (7), ch 1, turn
Row 4: dec, 3 sc, dec (5)
Fasten off. Weave in the yarn ends.
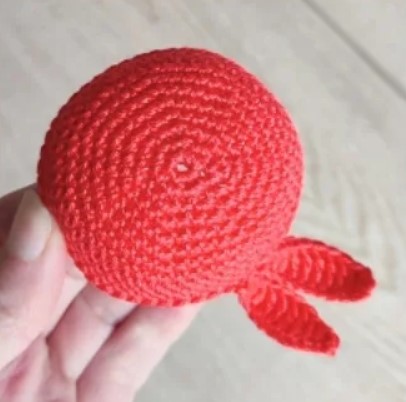
Bandana
Use red yarn.
Rnd 1: 6 sc in Mr (6)
Rnd 2: inc x 6 (12)
Rnd 3: (1 sc, inc) x 6 (18)
Rnd 4: (2 sc, inc) x 6 (24)
Rnd 5: (3 sc, inc) x 6 (30)
Rnd 6: (4 sc, inc) x 6 (36)
Rnd 7: (5 sc, inc) x 6 (42)
Rnd 8: (6 sc, inc) x 6 (48)
Rnd 9: (23 sc, inc) x 2 (50)
Rnd 10-12: 50 sc (50) (3 rounds)
Sl st.
With the yarn still attached ch 11 for the first of two “knot ends”, then work from the second st from the hook:
Row 1: sc, hdc, dc, tr 4, dc 2, hdc, sl st
Work another ch 11 and repeat the steps of row 1 for the second “knot end”.
Sl st in rnd 12, fasten off and weave in the yarn end.
Assembly
- Sew the snout onto the walrus face, between rnd 10 and 19, right under the eyes. Stuff the snout while sewing. Work a strand of brown yarn straight down from under the nose to the bottom of the snout.
- Embroider a nose in between rnd 1 and 3-4 if you haven’t used a safety nose.
- Sew the tusks onto the underside of the snout and secure them to the walrus chest with a couple of stitches.
- Use pins to position the front flippers between rn 25 and 28, with approx. 16 st in between them at the front. The flippers should fold a bit at the ends. Make sure the walrus can sit on its own before sewing the flippers on.
- Sew each tail flipper onto ine side of the end of the walrus body.
- Place the bandana on top of head. Give him the eye patch.
Done!