Designer: Autumn Faerie Crochet
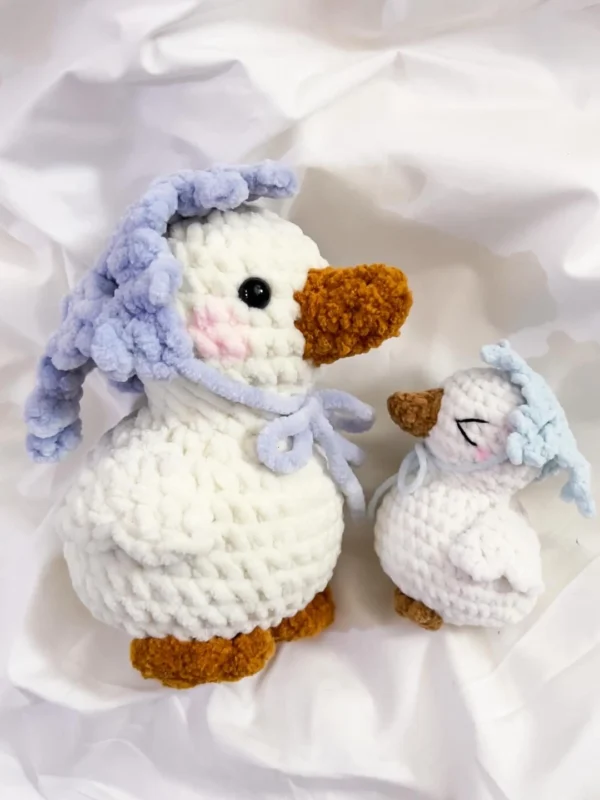
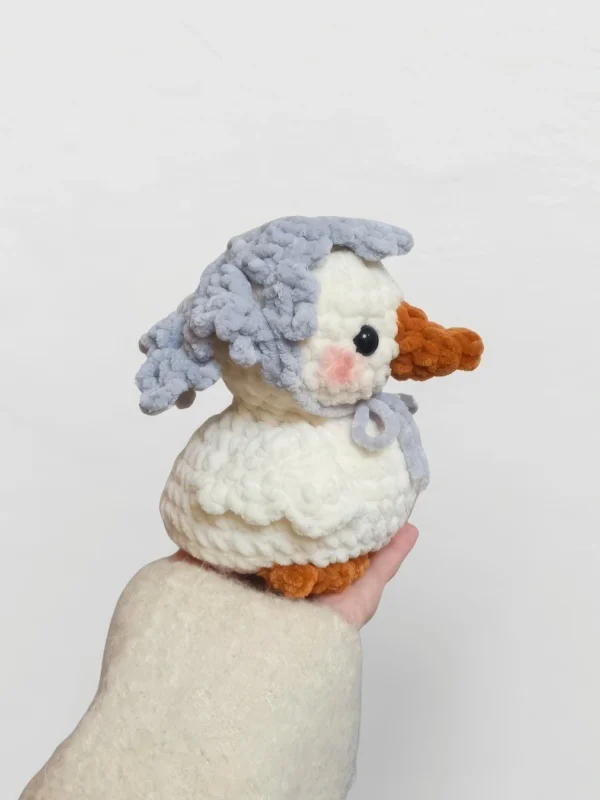
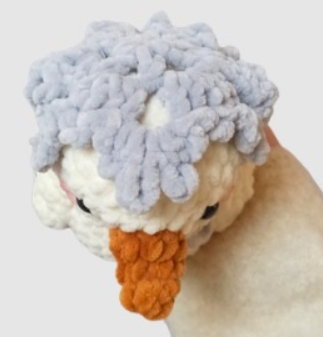
A charming crochet duckling dressed in a delicate snowflake bonnet; this handmade piece captures a playful wintertime charm with a warm feel.
This pattern is made in continuous rounds; don’t slip stitch or chain when beginning a new round unless stated in the pattern. The rest of the pattern is quite simple.
This tutorial is very detailed and also has a photo tutorial; it starts with making the body, wings, beak, feet, and snowflake bonnet.
You can use it in seasonal photo styling, add to winter or holiday décor displays, or pair with other winter- inspired amigurumi designs. Whether you’re decorating for the holidays or looking for the sweetest handmade gift idea, this little duckling is guaranteed to bring a smile to anyone who sees it, because honestly, who could resist a duck in a snowflake hat?
Materials
- 4 mm and 5 mm crochet hook
- Size 6 Chenille yarn in white, light blue and orange
- 10 mm or 12 mm safety eyes
- Pink cotton yarn or powdered blush and brush (for cheeks) (optional)
- Tapestry needle
- Stuffing
- Scissors
Abbreviatons
Mr – magic ring
ch – chain
sl st – slip stitch
sc – single crochet
dec – decrease
dc – double crochet
hdc – half double crochet
inc – increase
sk – skip a stitch
Body
In white, using a 5 mm hook:
Rnd 1: 6 sc in Mr (6)
Rnd 2: inc x 6 (12)
Rnd 3: (1 sc, 1 inc) x 6 (18)
Rnd 4: (2 scm 1 inc) x 6 (24)
Rnd 5-6: sc around (24)
The st markers on the next round mark the cheeks (where the blush will go).
Rnd 7: 7 sc, place a st marker on the last st, 2 inc, 6 sc, 2 inc, place a st marker on the next st, 7 sc (28)
Rnd 8: sc around (28)
Rnd 9: (2 sc, dec) x 7 (21)
Rnd 10: (sc, dec) x 7 (14)
Add safety eyes between rounds 6 and 7 with 6 visible sts between them. Stuff the head and cheeks generously.
Rnd 11-12: sc around (14)
Rnd 13: inc x 14 (28)
Rnd 14: 4 inc, 21 sc, 3 inc (35)
Rnd 15-18: sc around (35)
Rnd 19: 3 hdc inc (these should be at the center-back of the duck), 32 sc (38)
Rnd 20: sc around (38) – stuff the body generously
Rnd 21: dec x 19 (19)
Rnd 22: (1 sc, dec) x 6, sc (13)
Rnd 23: (1 sc, dec) x 4, sc (9)
Sl st and fasten off. Sew closed and secure.
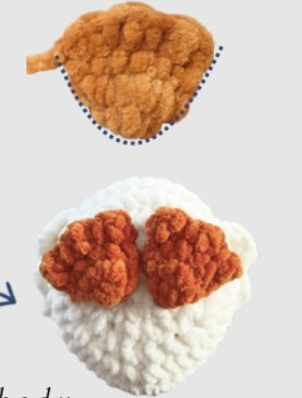
Wings x2
In white, using a 5 mm hook:
Rnd 1: ch 7 (7)
Rnd 2: starting in the 2nd ch from the hook, work 6 sc, ch 1 and turn (6)
Rnd 3: 5 sc, ch 1 and turn (5)
Rnd 4: sk 1, 4 sc, ch 1 and turn (4)
Rnd 5: 3 sc, ch 1 and turn (3)
Rnd 6: sk 1, 2 sc (2)
Fasten off, leaving a long tail for sewing.
Align the wing to the body for sewing. The fasten off tail should be at the front of the duck body and should align with the eye placement (dashed line below). The top of the wing should start at R12 and the bottom of the wing should align with R16. Sew 2 edges to the body, leaving the scalloped edge free (sew aling the dotted line below)

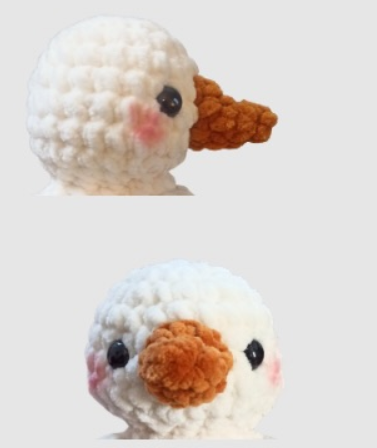
Beak
In orange, using a 4 mm hook:
Rnd 1: 4 sc in Mr (4)
Rnd 2: (1 sc, inc) x 2 (6)
Rnd 3: sc around (6)
Rnd 4: place a st marker on the last st, inc x 2, place a st marker on the next st, 4 sc (8)
Sl st and fasten off, leaving a long tail for sewing. Leave unstuffed and sew the beak across R5-8 of the head. Make sure that the increases marked with a st marker are at the top of the beak.
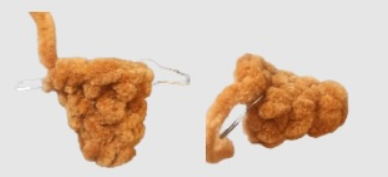
Feet x2
In orange, using a 4 mm hook:
Rnd 1: 5 sc in Mr (5)
Rnd 2: inc x 5 (10)
Rnd 3: fold in half, tuck the Mr tail into the foot and work 5 sc in both loops of both sides, ch 1 and turn (5)
Rnd 4: (dc, sl st) x 2, [dc, sl st]
Fasten off, leaving a long tail for sewing.
Sew the base of the feet to R23 of the body. Slightly angle to feet outwards and sew along the sides (dotted line) to secure in place.
Snowflake Bonnet
In light blue, using a 4 mm hook:
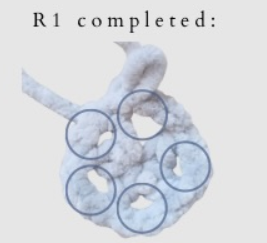
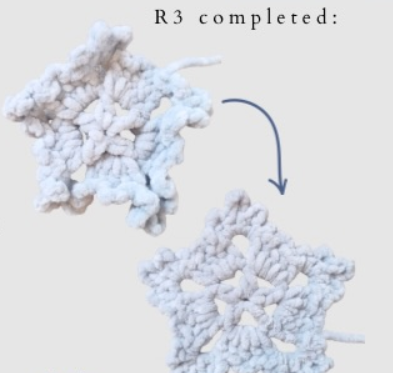
Rnd 1: ch 6 in a Mr, (this counts as the first dc), work (dc, ch 3) x 4, sl st into the 3rd ch from the inital ch 6 to complete the round.
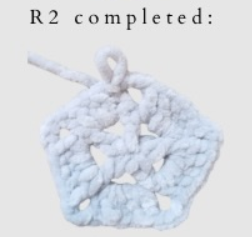
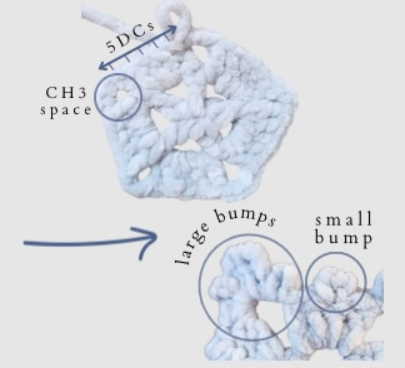
Rnd 2: in this round we will work into the ch 3, spaces only (see circles in R1). Sl st into the next ch 3 space, ch 3 (counts as first dc), 4 sc, ch 3, (5 sc, ch 3) x 4, sl st into the 3rd ch.
Rnd 3: in this round we will make a small bump in the middle of the dc sts and large bumps in the ch 3 spaces.
(2 sl st, ch 3, 3 sl st – this makes a small bump. You should now be in the ch 3 space. In this space we will work the large bumps: ch 3, sl st, ch 5, sl st, ch 7, sl st, ch 5, sl st, ch 3, sl st) 5 to create all the points of the snowflake.
Sl st and fasten off, leaving a long tail. The snowflake will be curled when finished. Stretch and shape it so that it becomes flat and shapely. You can also block it if you like.
Using the long fasten off tail and a tapestry needle, sew along the edge of the snowflake so the tail is at one of the 5 points. Attach another tail 2 points away. Secure and hide the Mr tail. We will use these tails to secure the bonnet to the head – tie a bow under the duck chin to secure and trim excess yarn.
Curve the bonnet around the duck head to give it some shape and keep her nice and warm.
Optional:
Use pink yarn and a tapestry needle to add blush to the duck’s cheeks, just under the eyes. Alternatively, you can use powdered blush and a small brush to apply.