Designer: Natascha Zayceva
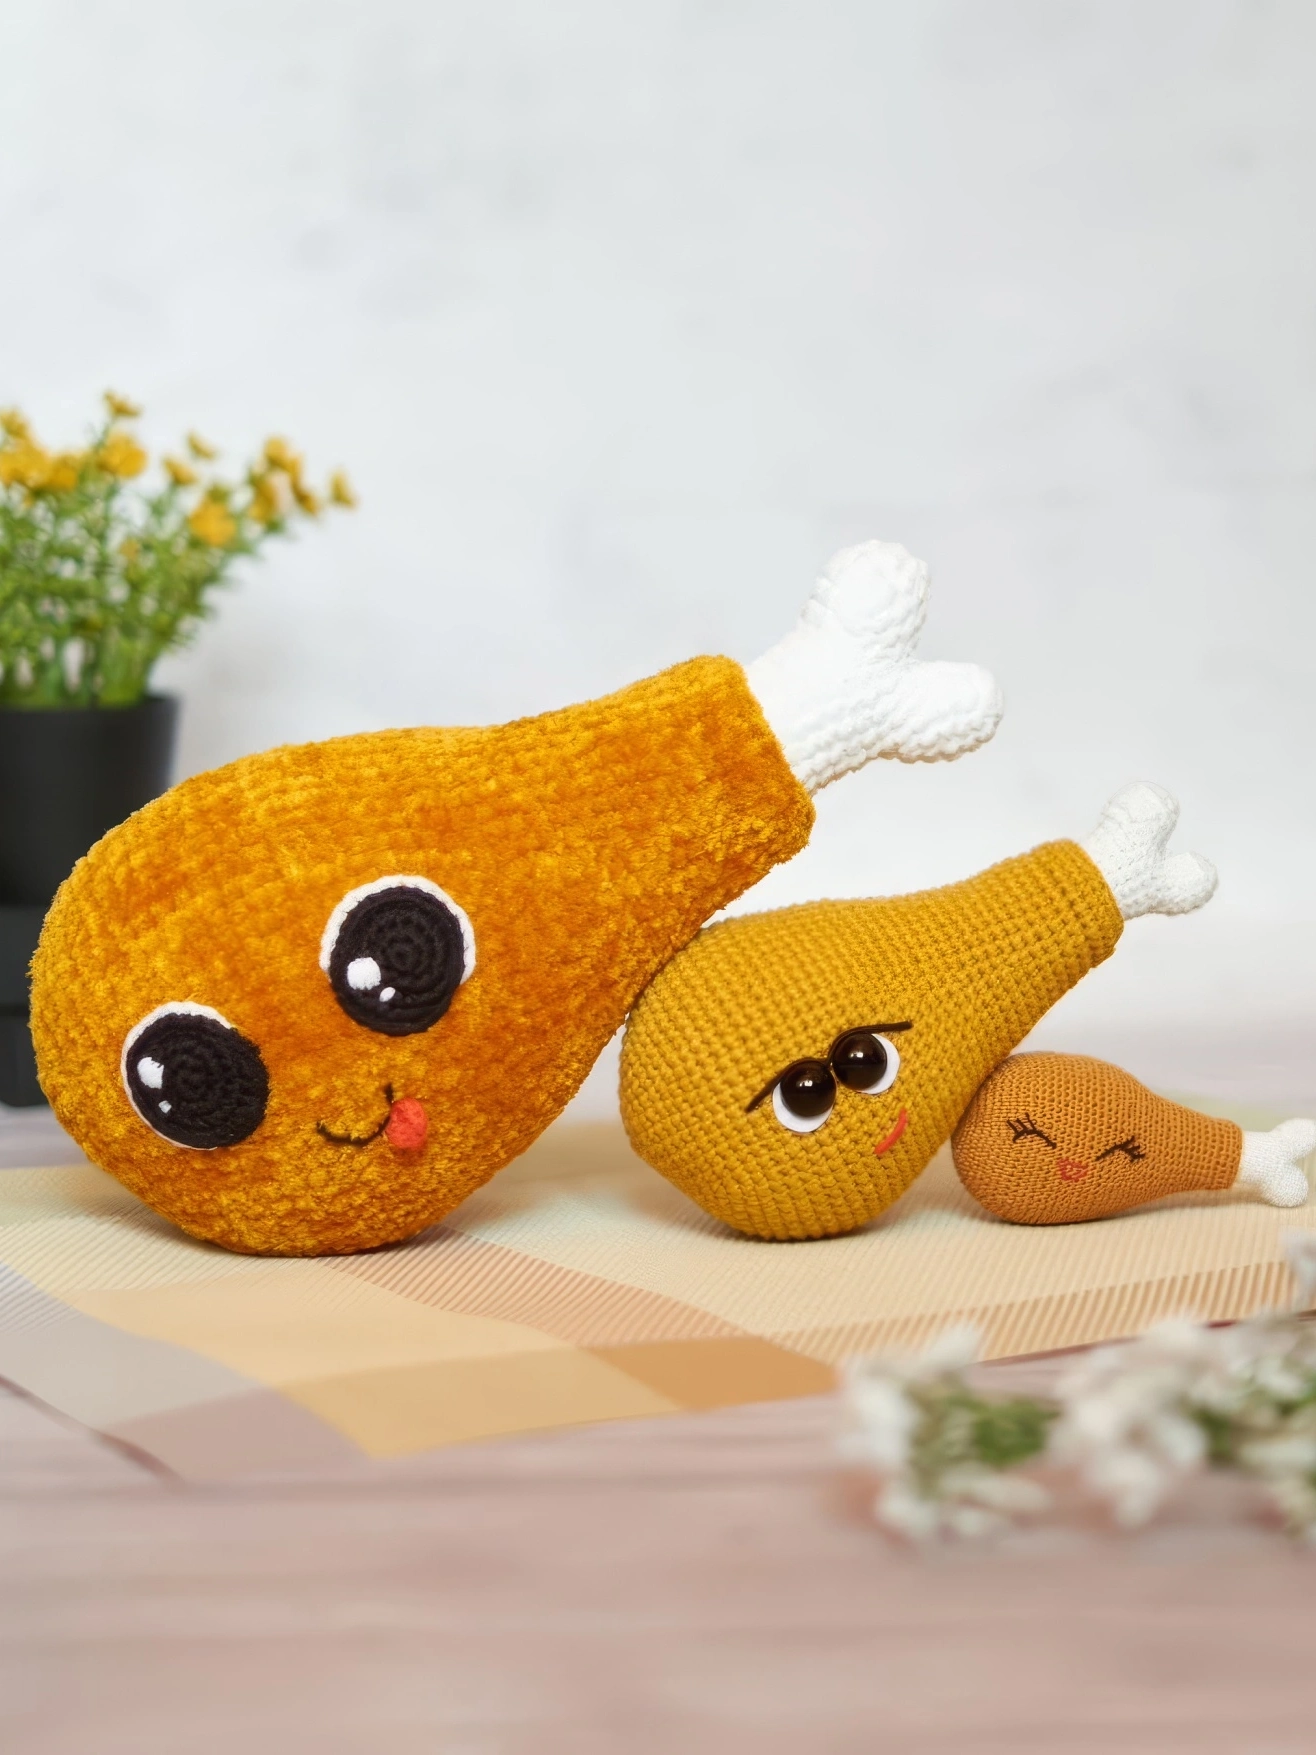
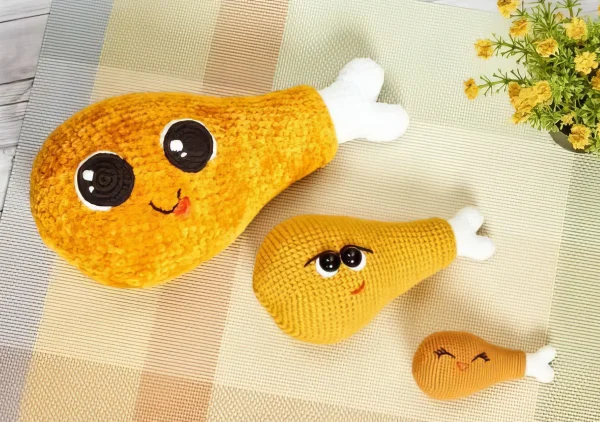
Meet a whole family of adorable chicken drumsticks – a big papa, a medium-sized mama and a tiny little baby. Thanks to their golden color and little white bones, they look so yummy that you just want to eat them up.
One of the fun things about this pattern is that the same design works in different sizes, just by changing the yarn and the hook. The big one is made with soft plush yarn and turns into a cozy pillow, while the smaller ones use regular cotton or acrylic yarn. For the drumstick you will need golden yellow or orange, and white for the bone, plus black, brown and white for the eyes, a bit of pink or red for the cheeks, a fitting crochet hook, some fiberfill, stitch markers and a tapestry needle.
Single crochet, increases, decreases and color changes cover almost everything here, so this pattern is friendly for beginners too.
Each drumstick is made in this order: first the leg itself, then the bone from two parts that you join together, and then you decorate your toy – there are three options depending on the size. Though of course no one stops you from making it any way you like.
Crochet the whole family as a funny little kitchen decoration, or as a pretend food play set for kids. Just don’t mix them up with real food by accident!
Materials
Medium Leg:
- Lanoso Alara yarn (50g/140 m, cotton 50%, acrylic 50%) in colors: 903 mustartd, 955 white
- YarnArt Jeans (50g/160m, cotton 55%, acrylic 45%) in colors: 53 black, 26 red
- 1,9 mm crochet hook
- Stuffing
- 12 mm safety eyes
- White felt under eyes.
- Glue
Small Leg:
- Yaroslav Cotton 14/2 (50g/350m, 100% cotton) in colors: mustard, white
- Fine yarn in black and white colors
- 0,95 mm crochet hook
- Stuffing
Large Leg:
- Naki Lily (100g/180m, 100% polyester) in colors: 4547 mustard, 208 white
- Yarnart Jeans (50g/160m cotton 55%, acrylic 45%) in colors: 01 white, 53 black, 26 red
- 3.5 mm crochet hook
- Stuffing
Size:
Large leg length: 24 cm
Medium leg length: 15 cm
Small leg lenght: 9 cm
Abbreviations
Mr – magic ring
ch – chain
sl st – slip stitch
sc – single crochet
inc – increae
dec – decrease
dc – double crochet
BLO – back loops only
FLO – front loops only
Leg
Begin with mustard color.
Rnd 1: 6 sc in Mr (6)
Rnd 2: inc x 6 (12)
Rnd 3: (sc, inc) x 6 (18)
Increases in rounds 4-7 are on the sides.
Rnd 4: 3 sc, inc x 4, 6 sc, inc x 2, 3 sc (24)
Rnd 5: 5 sc, inc x 4, 9 sc, inc x 2, 4 sc (30)
Rnd 6: 5 sc, (sc, inc) x 4, 9 sc, (sc, inc) x 2, 4 sc (36)
Rnd 7: 5 sc, (2 sc, inc) x 4, 9 sc, (2 sc, inc) x 2, 4 sc (42)
Rnd 8: (6 sc, inc) x 6 (48)
Rnd 9: (7 sc, inc) x 6 (54)
Rnd 10: (8 sc, inc) x 6 (60)
Rnd 11-12: 60 sc (60) (2 rounds)
Rnd 13: 16 sc, inc, 3 sc, inc, 39 sc (62)
Rnd 14-18: 62 sc (62) (5 rounds)
In round 19, decreases should be on one side, in round 21 – on the other side (approximately inder increases in rounds 4-7). Move the marker of the round beginning if necessary.
Rnd 19: 46 sc, (dec, 2 sc) x 3, 4 sc (59)
Rnd 20: 59 sc (59)
Rnd 21: 16 sc, dec, 3 sc, dec, 36 sc (57)
Rnd 22-23: 57 sc (57) (2 rounds)
Rnd 24: (17 sc, dec) x 3 (54)
Rnd 25: 54 sc (54)
Rnd 26: (7 sc, dec) x 6 (48)
Rnd 27: 48 sc (48)
Rnd 28: (6 sc, dec) x 6 (42)
Rnd 29-30: 42 sc (42) (2 rounds)
Rnd 31: (5 sc, dec) x 6 (36)
Rnd 32-34: 36 sc (36) (3 rounds)
Rnd 35: (4 sc, dec) x 6 (30)
Rnd 36-40: 30 sc (30) (5 rounds)
Begin to stuff.
Bone
Change color to whote, bring the mustard yarn to the front.
Rnd 1: BLO (3 sc, dec) x 6 (24)
Rnd 2: (2 sc, dec) x 6 (18)
Rnd 3-8: 18 sc (18) (6 rounds)
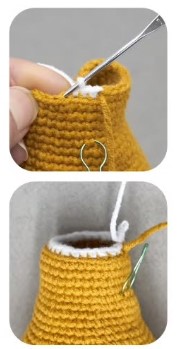
Leave crocheting the bone for now, work in front loops of round 40 on the leg.
Rnd 41: FLO: 30 sc (30)
Rnd 42: 30 sc (30)
Rnd 43: (sc, dec) x 10 (20), 2 cc
Cut the mustard yarn, fasten off and hide.
Continue crocheting a bone.
In rounds 9-10, increases are on the sides.If necessary, move the marker of the round beginning.
Rnd 9: inc x 2, 6 sc, inc x 3, 6 sc, inc (24)
Rnd 10: (inc, sc) x 2, 6 sc, (inc, sc) x 3, 6 sc, inc, sc (30)
Rnd 11: 30 sc (30)
Divide the bone into 2 parts: into 17 and 13 stitches. You will have 10 sc from the beginning of the round to the marker, if not just take this into account on the next round.
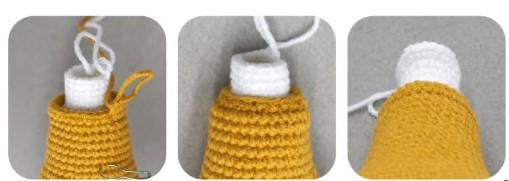
First Part
Rnd 12: 10 sc (to the marker), leave unused 13 stitches, 7 sc (from the marker) (17)
Rnd 13: 9 sc, dec, 6 sc (16)
Rnd 14: (2 sc, dec) x 4 (12)
Rnd 15: dec x 6
Tighten the hole through front loops, fasten off, weave in the ends.
Stuff a leg and a bone.
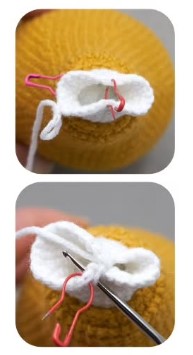
Second Part
Start from the frist unused stitch.
Rnd 12: 11 sc, dec (2)
Rnd 13-14: 12 sc (12) (2 rounds)
Rnd 15: dec x 6 (6)
Tighten the hole through fron loops, fasten off, weave in the ends.
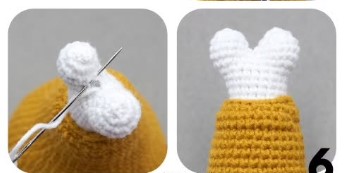
Stuff completely.
Sew the hole with the left thread, fasten off, weave in the ends.
Decoration
Medium Leg
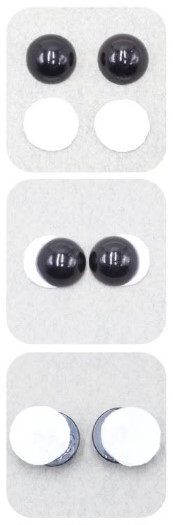
- Cut out two circles of felt according to the diameter of half-beads pupils. Glue the pupils slightly shifted to the edge so that the white part remains about 2mm.
- Glue the eyes after round 14 of the part in the middle next to each other with whites of the eyes slightly down.
- Embroider a mouth with a red thread, insert the needle somewhere under the eyes and leave the end, exit the thread between the eyes 3-4 rounds below from the lower edge of the eyes. Insert the needle through 3 rounds to the right and 1.5 sc up, exit it through the starting point. Tie the ends in a knot and hide
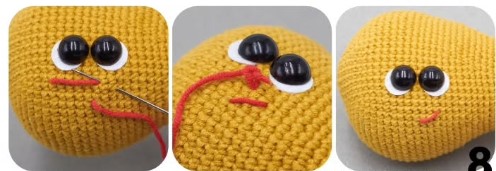
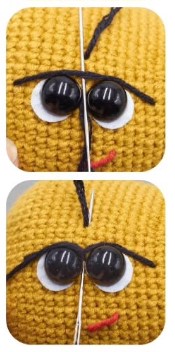
- Embroider eyelids – the edges are 2 rounds to the sides from the whites of the eyes and 1 sc below the upper edge of the eyes.
- Insert the needle in the middle just above the eyes (leave the end), exit it through one end and insert it from the other, making a long stitch. Exit the thread between the eyes, stretch it under the stitch, insert the needle in the same place between the eyes and exit it through the starting point. Tie the ends in a knot and hide.
Large Leg
Eyes x2
With black yarn.
Rnd 1: 7 sc in Mr (7)
Rnd 2: inc x 7 (14)
Rnd 3: (inc, sc) x 7 (21)
Rnd 4: (2 sc, inc) x 7 (28), skip 1 stitch, 2 sl st
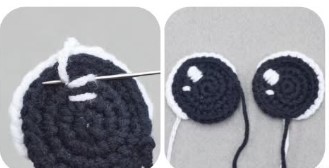
Leave the end for sewing pieces and embroidery of mouth. Next, crochet in white color along back bumos of the last round. Start crocheting from the first stitch.
Rnd 1: ch 1 into the first stitch, from the second stitch 17 sc, sl st.
Leave the end for sewing pieces and embroidery of glares. With a white thread make 2 stitches 2 sc long between rounds 2-3 and rounds 3-4 and fill the space between them with the same stitches. Embroider small glare with 2 short stitches one stitch below. Fix the thread, do not cut ut. Glares should be on the right or left sides equally for both eyes.
Tongue
WIth red color.
Rnd 1: In Mr – sc, 3 dc, sc (do not pull the ring)
Leave the yarn tail for sewing.
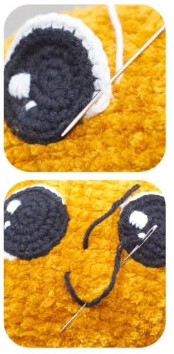
Sew the eyes separately along white and black parts. Sew in the middle after round 8, between the eyes – 5 rounds. Before sewing, fix the eyes with pins to place them evenly and symmetrically. Sew under the front loops of the last round and into stitches on the pieces (photos 1-3).
Fix white threads, hide inside. After sewing, pass one black thread between eyes and leave it for now, embroider a mouth with the second black thread – 1 sc down from the lower edge of the eyes. The edges of the mouth are at the same level with the inner edges of the eyes.
Exit the thread through one edge of the mouth, insert the needle into the other edge, and exit it through 2 sc down in the middle – the thread under the needle. Insert the needle in the same place, but over the stitch. So that the mouth is a semicircle, similarly fix it between the middle and the edges. At the end, exit the thread where the first black thread, tie in a knot and hide inside.
Sew the tongue to the main part on one side of the mouth right under the black thread. Fix the threads, hide inside.
Small Leg
Split yarn Yarnart Jeans and used 1 thread.
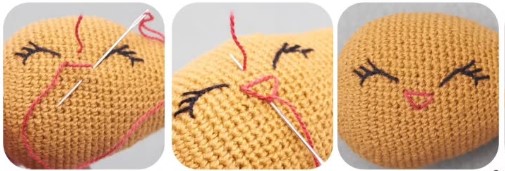
Embroider eyes after round 10 of the part in the middle. Eyelid length – 5 rounds, height – 2 sc. Between the eyelids – 6 rounds.
Insert the needle anywhere between the eyes (leave the end), exit it through the edge of the eyelid, make a stitch for the eyelids, exit the needle over this stitch, make a lash 2 sc long and exit the needle under the black thread next to it for the next lash (photo 2). Embroider 3 lashes. At the end, exit the thread through the starting point, tie the ends in a knot, hide inside.
Embroider a mouth one round below the eyelids. Mouth length – 4 rounds, height – 2 sc.
First make a stitch from above, then exit the needle through the middle 2 sc down (the thread should be under the needle), insert it in the same place over the red thread and exit it through the starting point (photo 6).
Fix the threads, hide inside.