Designer: Tangled Baru
If you’ve been wanting a cute new make, I’ve got just the project for you. This is a free Dobby the House Elf crochet pattern that’s super easy and perfect for any Harry Potter fan. You can easily customize this little elf by using different yarn colors & themes.
This free crochet pattern starts by making the arms, legs, body, ears, nose, head, tunic, small sock, large sock, and how to assemble all parts.
All you need to make this Dobby is to know some basic crochet stitches like single crochet stitches, half double crochet, and some crochet techniques like increases and decreases.
You can use it as a unique handmade gift for fantasy lovers, use it in whimsical photography or storytelling scenes, or display it as a small decorative companion with a touch of handmade magic.
Materials
- YarnArt jeans yarn in colors:
- Light peach (body), beige (tunic), dark gray (socks), black, white, green (for embroidery eyes)
- 2.5 mm crochet hook
- 6 mm safety eyes
- Fitting crochet hook
- Yarn needle
- Scissors
- Stitch markers
- Safety eyes
- Fiber stuffing
Size: 8 cm tall
Abbreviations
Mr – magic ring
sc – single crochet
sl st – slip stitch
hdc – half double crochet
inc – increase
dec – decrease
hdc-inc – half double crochet increase
hdc-dec – half double crochet decrease
The pattern is worked in continuous rounds.

Arms x2
Rnd 1: 6 sc in a Mr (6)
Rnd 2-7: 6 sc (6) (6 rounds)
Sl st ti the next stitch.
Fasten off, cut the yarn (leave short tail).

Legs x2
Rnd 1: 6 sc in a Mr (6)
Rnd 2: (sc, inc) x 3 (9)
Rnd 3-5: 9 sc (9) (3 rounds)
First leg: sl st to the next stitch. Faste off, cut the yarn (leave short tail).
Don’t finish off the second leg.

Body
Continue working on the second leg, both legs will be connected in the first rounds.
Rnd 1: ch 2, 9 sc around Leg 1, 2 sc into the chain, 9 sc around Leg 2, 2 sc into the chain (22)
Rnd 2-5: 22 sc (22) (4 rounds)

Both arms will be joined in R6:
Fold the arm in half, then crochet through both layers of the arm together with the body.

Rnd 6: 3 sc, 3 sc with Arm 1, 9 sc, 3 sc with Arm 2, 5 sc (22)
Rnd 7: 2 sc, dec, sc, dec, 6 sc, dec, sc, dec, 4 sc (18)
Fasten off, cut the yarn leaving a short end.
Ears x2
Rnd 1: 4 sc in a Mr (4)
Rnd 2: (sc, inc) x 2 (6)
Rnd 3: (sc, inc, sc) x 2 (8)
Rnd 4: (3 sc, inc) x 2 (10)
Rnd 5: (2 sc, inc, 2 sc) x 2 (12)
Rnd 6: (5 sc, inc) x 2 (14)
Fold the ear in half, ch 1, close by crocheting 7 sc through both layers.
Fasten off, leave a long tail for sewing.

Nose
Rnd 1: 4 sc in a Mr (4)
Rnd 2: 4 sc (4)
Rnd 3: sc, inc, 2 sc (5)
Rnd 4: inc ,4 sc (6)
Sl st into the next stitch, fasten off, leave a long tail for sewing.

Head
Rnd 1: 6 sc in a Mr (6)
Rnd 2: 6 inc (12)
Rnd 3: (sc, inc) x 6 (18)
Rnd 4: (sc, inc, sc) x 6 (24)
Rnd 5: (3 sc, inc) x 6 (30)
Rnd 6: (2 sc, inc, 2 sc) x 6 (36)
Rnd 7-10: 36 sc (36) (4 rounds)
Rnd 11: (2 sc, dec, 2 sc) x 6 (30)
Rnd 12: (3 sc, dec) x 6 (24)
Rnd 13: (sc, dec, sc) x 6 (18)
Fasten off, leave a long tail for sewing.

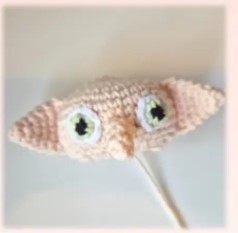
You can either embroider the eyes or insert safety eyes between rounds 8-9 about 5 visible stitches apart from each other.
Sew the nose between the eyes, covering rounds 9-10.
Sew the ears on both sides of the head, covering rounds 6-11, make sure the ears are centered with the face.
Assembly
- Stuff both, the head and the body.
- For the neck, align the 18 stitches on the head with the 18 stitches on the body. Sew together using the long yarn strand from the head. Make sure the face is centered with the body.
Tunic
The tunic is worked in rows. The length of the tunic should cover 9 rounds of the body and legs.
Row 1: ch 11 (11)
Row 2: skip the first chain, 10 sl st (10)
Row 3: ch 1, turn, 7 hdc (leave the row unfinished) (7)
Row 4: ch 1, turn, hdc-dec, 6 hdc (6)
Row 5-8: ch 1, turn, 6 hdc (6) (4 rows)
Row 9: ch 1, turn, 5 hdc, hdc-inc (7)
We are going to make an armhole in the next row.
Row 10: ch 4, turn, skip the chain + 3 stitches on R9, 3 hdc (leave the last stitch unfinished) (6)
Row 11: ch 3, turn, skip the frist chain, 2 hdc into the chain, 3 hdc, 3 hdc + 1 sc into the armhole (9)
Row 12: ch 1, turn, 3 sc, 6 hdc (9)
Row 13: ch 1, turn, 7 hdc, 2 sc (9)
Row 14: ch 1, turn, 1 sc, 7 hdc (leave unfinished) (8)
Row 15-16: ch 1, turn, 8 hdc (8)
Row 17: ch 1, turn, 7 hdc, to the last stitch: (hdc, ch 2, hdc) (11)
Row 18: ch 3, turn, skip the first chain, 2 sl st into the chain, sl st, 2 sl st into the ch 2 space, 7 sl st (leave unfinished) (12)
Fasten off, cut the yarn leaing a long tail for sewing.

Dressing Up
- The longer part of the tunic is on the back, the shorter part on the front.
- The left hand will go through the armhole.

- Sew the side under the right arm.
- Slip the top strap through the ch 2 loop on the second strap over the right shoulder. Secure with a seam.

Small Sock
Best for: when you are using the same yarn weight and hook size for both the doll and the sock.
This sock size will perfectly match the doll’s hands when made from the same yarn weight.
Rnd 1: 5 sc in a Mr (5)
Rnd 2-3: 5 sc (5) (2 rounds)
Rnd 4-6: 2 hdc, 3 sl st (5) (3 rounds)
Rnd 7-8: 5 sc (5)
Rnd 9: 3 sc, 2 sl st (5)
Fasten off, cut the yarn short, weave in the ends.

Large Sock
Best for: when you are making the doll from a thicker yarn but want to use a thinner cotton/acrylic yarn for the sock.
If you use the same yarn for both, this sock will look oversized.
Rnd 1: 5 sc in a Mr (5)
Rnd 2: 5 inc (10)
Rnd 3-6: 10 sc (10) (4 rounds)
Rnd 7-10: sc, 3 hdc, sc, 5 sl st (10) (4 rounds)
Rnd 11-15: 10 sc (10) (5 rounds)
Rnd 16: 10 sl st (10)

Fasten off, cut the yarn short, weave in the end.