Designer: Mein Haekelzauber
Add a touch of fairy magic to your shelf with this beautiful Sylveon amigurumi, inspired by the beloved Pokemon character! A soft cream texture, pink ears and paws, big shiny eyes, and the signature ribbons and bows make this graceful toy a dream for any fan who will definitely want this Pokémon in their collection.
To make this pattern you will need bulky yarn in pink, light blue, blue, and white, 30 mm safety eyes, a 6.5 mm crochet hook, fiberfill, a tapestry needle, and stitch markers.
The stitches used in this tutorial are simple and easy, like single crochet stitches, half double crochet, double crochet, and some crochet techniques like increasing, decreasing, and changing colors. Nothing complicated at all you will start with the legs, the body, and the head, then the tails, the head with the hat, 4 ears, and the most important part, the 4 ribbons.
Grab your softest yarn, pour yourself something warm, and let those ribbons bloom stitch by stitch. Let’s get started!
Materials
- Bulky yarn (Alize Velluto size 6) in colors:
- blue, light blue, pink, white
- 30 mm safety eyes
- 6.5 mm crochet hook
- Stuffing
- Scissors
- Stitch marker
- Darning needle
Abbreviations
ch – chain
sl st – slip stitch
sc – single crochet
dc – double crochet
hdc – half double crochet
tr – triple crochet
BO – bobble stitch
inc – increase
dec – decrease

Legs x4
Start with pink yarn.
Rnd 1: 5 sc in Mr (5)
Rnd 2: inc x 5 (10)
Rnd 3: 2 sc, BO x 3, 5 sc (10)
Rnd 4: 10 sc (10) change color to white
Rnd 5-7: 10 sc (10) (3 rounds)
Stuff the legs.
Fasten off 3 of the legs, don’t cut the yarn on the 4th, we continue the body here.

Body
Start with white yarn.
4 sc on the last leg, connect the leg with 2ch together. The feet should be facing to the front when we connect them, we start at the back legs. Place stitch marker here.Place the legs slightly crossed to each other.
8 sc on each leg. We connect each leg with 2ch, till we reach our stitch marker (40)
You can recignize the front part on the body by the fact that the toes point forward.
The toes should be slightly facing each other.

Rnd 9-13: 40 sc (40) (5 rounds)
Rnd 14: 20 sc, dec, 16 sc, dec (38)
Rnd 15: dec, 18 sc, dec, 14 sc, dec (35)
Rnd 16: dec, (3 sc, dec) x 6, 3 sc (28)
Fasten off. Leave a long tail for sewing.

Place the decrease between front and back legs.
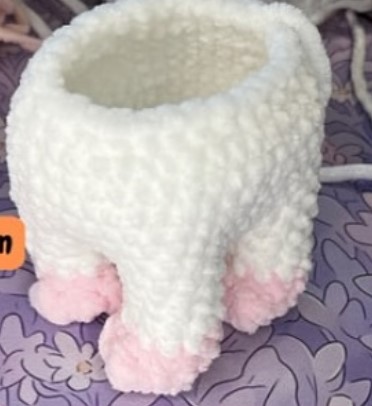
Rnd 1: insert hook to the back inner leg and sc around (16)
Rnd 2: dec, 6 sc, dec, 6 sc (14)
Make sure the decrease is placed between the front and back legs, maybe you have to do more sc.
Fasten off. Close the down part of the body by sewing it in a line. Stuff the legs and body tightly and close the upper part of the body by sewing it in a line.
You can recognize the front part on the body by the fact that the toes point forward.

Tail Small
Start with pink yarn.
Rnd 1: 4 sc in Mr (4)
Rnd 2: inc, 3 sc (5)
Rnd 3: (inc, sc) x 2, inc (8)
Rnd 4: (sc, inc) x 4 (12)
Rnd 5-6: 12 sc (12) (2 rounds)
Fold in half, crochet through both sides.

Fasten off. Don’t stuff. You don’t need a long tail for sewing.

Tail Big
Start with pink yarn.
Rnd 1: 6 sc in Mr (6)
Rnd 2: 6 sc (6)
Rnd 3: (sc, inc) x 3 (9)
Rnd 4: 9 sc (9)
Rnd 5: (sc, inc) x 4, sc (13)
Rnd 6: 13 sc (13)
Rnd 7: (sc, inc) x 6, sc (19)
Rnd 8-11: 19 sc (19) (4 rounds)
Rnd 12: 11 sc, (dec) x 4 (15)
Rnd 13: 3 sc, (dec) x 2, 2 sc, attach the smaller piece by crocheting through both sides 6 sc (13)
Rnd 14: 13 sc (13)
Stuff.
Fasten off. Leave a long tail for sewing.

Head
Start with white yarn.
Rnd 1: 6 sc in Mr (6)
Rnd 2: inc x 6 (12)
Rnd 3: (sc, inc) x 6 (18)
Rnd 4: (2 sc, inc) x 6 (24)
Rnd 5: (3 sc, inc) x 6 (30)
Rnd 6: (4 sc, inc) x 6 (36)
Rnd 7-11: 36 sc (36) (5 rounds)
Rnd 12: (4 sc, dec) x 6 (30)
Rnd 13: (3 sc, dec) x 6 (24)
Rnd 14: (2 sc, dec) x 6 (18)
Fasten off. Leave a long tail for sewing.
Insert eyes at R9-11 with 8 sc apart.
Stuff the head.

Cap
Start with pink yarn.
Rnd 1: 6 sc in Mr (6)
Rnd 2: inc x 6 (12)
Rnd 3: (sc, inc) x 6 (18)
Rnd 4: (2 sc, inc) x 6 (24)
Rnd 5: (3 sc, inc) x 6 (30)
Rnd 6: (4 sc, inc) x 6 (36)
Rnd 7-10: 36 sc (36) (4 rounds)
Rnd 11: 7 sc, 1 ch, turn (7)
Rnd 12: skip 1 stitch, 6 sc, 1 ch, turn (6)
Rnd 13: skip 1 stitch, 5 sc, 1 ch, turn (5)
Rnd 14: skip 1 stitch, 4 sc, 1 ch, turn (4)
Rnd 15: skip 1 stitch, 3 sc, 1 ch, turn (3)
Rnd 16: skip 1 stitch, 2 sc, 1 ch, turn (2)
Rnd 17: skip 1 stitch, sc (1)
Fasten off. Leave a long tail for sewing.
Sew the cap at the head, the peak should be on R9 between the eyes.

Ears Small x2
Start with pink yarn.
Rnd 1: 4 sc in Mr (4)
Rnd 2: inc, 3 sc (5)
Rnd 3: inc, 4 sc (6)
Rnd 4: 6 sc (6) Don’t stuff.
Fold in half, crochet 3 sc through both sides.
Fasten off. We don’t need to leave a tail for sewing.
Ears x2
Start with pink yarn.
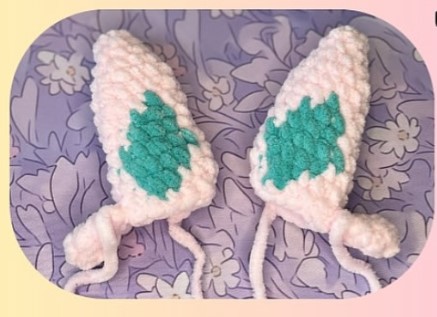
Color change is marked, there is a left and a right ear.
Rnd 1: 4 sc in Mr (4)
Rnd 2: inc, 3 sc (5)
Rnd 3: inc, 4 sc (6)
Rnd 4: (2 sc, inc) x 2 (8)
Rnd 5: (sc, inc) x 4 (12)
Rnd 6-7: 12 sc (12) (2 rounds)
Rnd 8: 4 sc, 1 sc, 7 sc (12)
Rnd 9-10: 3 sc, 3 sc, 6 sc (12) (2 rounds)
Rnd 11: inc, 1 sc, 2 sc, inc, 2 sc, 1 sc, inc, 3 sc (15)
Rnd 12: 4 sc, 4 sc, 7 sc (15)
Rnd 13: 5 sc, 2 sc, 8 sc (15) Fasten off the blue yarn.
Rnd 14: (Left ear): 1 sc, attach the smaller ear piece by crocheting through both sides 3 sc, 4 sc, 3x dec, 1 sc (12)
Rnd 14: (Right ear): 1 sc, 3x dec, 3 sc, attach the smaller ear piece by crocheting through both side 3 sc, 2 sc (12)
Fasten off. Don’t stuff. Leave a long tail for sewing.
Assembly
- Sew the head to the body, make sure that the transition of the cap is barely visible.

- Sew the tail to the back part of the body between R16 and R12 make sure that the smaller part of the tail is below.

- Sew the ears to the head between R5 and R8 with 6 sc apart. Make sure they are sewn on the correct side and the smaller parts are on the side of the ear.

Ribbon x4
Leave a long tail at the start.
Start with white yarn: 4 ch, start at 2nd chain from the hook:
Rnd 1-25: 3 sc, ch, turn (25 rounds)
Change to pink:
Rnd 26-27: 3 sc, ch, turn (2 rounds)
Change to blue:
Rnd 28-29: 3 sc, ch, turn (2 rounds)
Change to blue:
Rnd 30: 3 sc, ch, turn
Rnd 31: dc x 2, sl st, dc x 2
Fasten off. Leave a tail for sewing.
You should corhcet around the yarn strings from the color change, so tehy are hidden and will not be seen ever again.
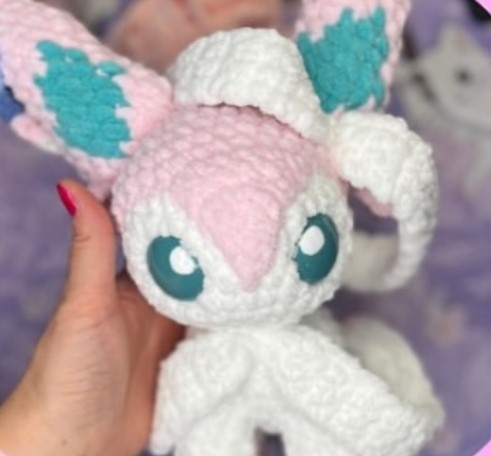
Sew the ribbon on the ear and the neck.

Use the tail of the end part of the ribbon to sew it on the place you like.
Bow Large
All stitches into Mr:
Leave a long pink tail for later.
Start with pink: 4 ch, 6 tr, 4 ch, sl st, 4 ch, 6 tr, 4 ch, sl st. Close the Mr.
Change to white: crochet 4 hdc into ch-space, 6 hdc, 4 hdc into ch-space, sl st. 4 hdc into ch-space, 6 hdc, 4 hdc into ch-space, sl st.
Fasten off and leave a long tail for sewing. Take the pink tail and wrap around the middle to create the right bow form. Fasten off and sew it into the ear and the neck.

Bow Small
All stitches into MR:
Leave a ling pink tail for later.
Start with pink: 3 ch, 5x dc, 3 ch, sl st, 3 ch, 5x dc, 3 ch, sl st. Close the Mr.
Change to white: crochet 3 sc into ch-space, 5x hdc, 3 sc into ch-space, sl st, 3 sc into ch-space, 5x hdc, 3 sc into ch-space, sl st.
Fasten off and leave a long tail for sewing. Take the pink tail and wrap around the middle to create the right bow form. Fasten off and sew it into the ear and the neck.