
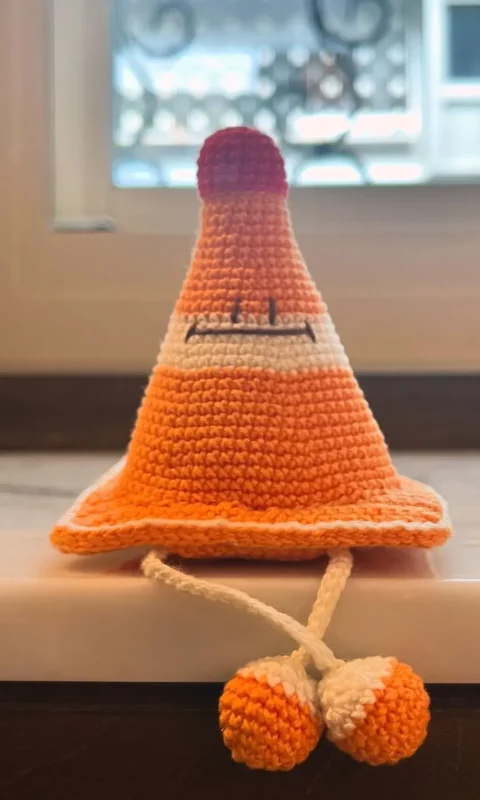
Crochet traffic cones can be a lot of fun if you use them as car decor or for themed events. They can also be used as children’s toys, or they can be part of a toy set that includes cars and trucks.
With just using simple stitches like single crochet stitch, and increasing and decreasing techniques, you can make this beautiful traffic cone. You can also change the yarn used and hook size if you need to make a bigger or smaller one.
This pattern contains instructions for making the body of the cone, and the base which was made of 2 panels, and then attaching them together using a tapestry needle, as well as the palms, legs, and at the end, we will sew all parts together and stuff while attaching.
You can add a smiley face to the cone which gives it a funny look. So crochet traffic cones are fun, easy to make, and a great choice for amigurumi beginners.
Designer: mstinacrochet
Materials
- Lace yarn #3
- 1.75 mm crochet hook
- Tapestry needle
- Pins
- Markers
- Fiber fill
Abbreviations
mr – magic ring
ch – chain stitch
sc – single crochet
inc – increase
dec – decrease
BLO – through back loops only
FO – fasten off
sl st – slip stitch
Body
Get started with red yarn:
Rnd 1: 6 sc in the Mr (6)
Rnd 2: 6 inc (12)
Rnd 3: (1 sc, 1 inc) x 6 (18)
Rnd 4-7: 18 sc (18)
Change of orange yarn, make 18 stitches through back loops only.
Rnd 8: BLO, 18 sc (18)
Rnd 9-10: 18 sc (18)
Rnd 11: (2 sc, inc) x 6 (24)
Rnd 12-13: 24 sc (24)
Rnd 14: (3 sc, 1 inc) x 6 (30)
Rnd 15-16: 30 sc (30)
Rnd 17: (4 sc, 1 inc) x 6 (36)
Rnd 18: 36 sc (36)
Change of white yarn, do not make sl sts.
Rnd 19: 36 sc (36)
Rnd 20: (5 sc, 1 inc) x 6 (42)
Rnd 21-22: 42 sc (42)
Rnd 23: (6 sc, 1 inc) x 6 (38)
Change of orange yarn, do not make sl sts.
Rnd 24-25: 48 sc (48)
Rnd 26: (7 sc, 1 inc) x 6 (54)
Rnd 27-28: 54 sc (54)
Rnd 29: (8 sc, 1 inc) x 6 (60)
Rnd 30-31: 60 sc (60)
Rnd 32: (9 sc, 1 inc) x 6 (66)
Rnd 33: 66 sc (66)
Rnd 34: 66 sc, sl st (66)
FO and leave a long tail. Filling it with fiber fill when you sew body and bottom.
Bottom x2
Get started with orange yarn:
Rnd 1: ch 27, from the second last st, crochet 26 sc (26)
Rnd 2-26: ch 1, turn, 26 sc (26)
Next, crochet along all four sides of the edge to make the edges neat:
inc, 12 sc, inc, 25 sc, inc, 12 sc, inc, 25 sc (82)
FO, close the hole and hide the yarn tail.
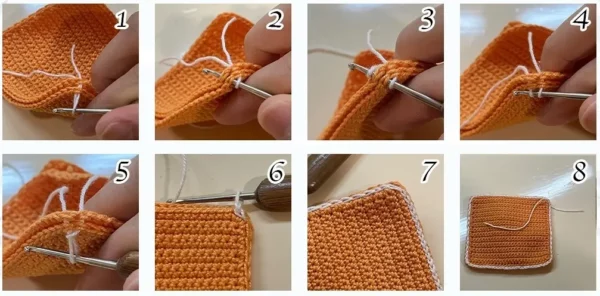
Combining Bottoms
Overlap the two square pieces of fabric to form the base, and hook and draw stitches along the edges so that the two pieces fit together.
If the number of stitches is obvious, it is the front side; if the number of stitches is not obvious, it is the backside. The next step is to step is to sew to the body, so that the front side is on the same die as the body.
Sewing the Base to the Body
- Fill the body with about half of the fiber fill.
- Secure the four points with a large needle and start sewing. Be careful to insert the needle diagonally and clip it into the lining to avoid being pricked. The distance between the main body and the edge of the base is about two turn.
- Sew the body and the base while filling the gap with cotton little by little and knotted it ti hide the yarn tails.
Palms x2
Get started with orange yarn:
Rnd 1: 6 sc in the Mr (6)
Rnd 2: 6 inc (12)
Rnd 3: (1 sc, 1 inc) x 6 (18)
Rnd 4-5: 18 sc (18)
Change of white yarn, do not make sl sts.
Rnd 6: 18 sc (18)
Filling it with fiber fill.
Rnd 7: (1 sc, 1 inc) x 6 (12)
Rnd 8: 6 dec, sl st (6)
FO, cut the yarns and leave one long tail, and knot the other to hide the yarns without leaving them.
Leg
Get started with white yarn:
Ch 41, from the second last st, crochet 40 sl st. Leave a long tail for sewing.
Connecting traffic cones with legs
Sew the end of the “no” yarn to one foot. Pass the needle through the yarn and then through the base, with the distance between the legs about the width of your mouth. Sew the other end of the foot to the base.
