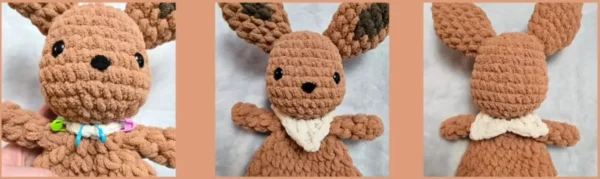
Let’s introduce a very simple and very detailed fox amigurumi pattern with pointed ears, a plushy tail, and a cute collar, it’s a fun design to work on and very suitable for advanced beginners.
All you need to know before working on this pattern is how to make single crochet stitch, half double crochet stitch, double crochet stitch, and some special stitches like picot stitch, also you need to know how to increase, decrease, and how to switch between colors to use it in tail, and ears parts.
You can customize this free pattern by using different colors with different yarn weights and making different sizes of the toy.
This pattern will be a good choice as a toy for children, a stuffed animal gift for fox lovers, a nursery décor for baby rooms, a holiday gift, or a birthday gift.
Designer: Willow & Wild
Materials & Tools
- Yarn: weight 6
- 8 mm crochet hook
- 14 m msafety eyes
- Tapestry needle
- Stuffing
- Scissors
Abbreviations
sc – single crochet
inc – increase
dec – decrease
hdc – half double crochet
dc – double crochet
sl st – slip stitch
ch – chain
picot2 – ch 2, sl st into 2nd ch from hook
Head
With brown yarn.
Rnd 1: 8 sc in a Mr (8)
Rnd 2: inc x 8 (16)
Rnd 3: (1 sc, 1 inc) x 8 (24)
Rnd 4-6: sc around (24)
Rnd 7: (3 sc, inc) x 6 (30)
Rnd 8-9: sc around (30)
Rnd 10: (3 sc, dec) x 6 (24)
Rnd 11: (2 sc, dec) x 6 (18)
Rnd 12: (1 sc, dec) x 6 (12)
Place safety eyes between R7 and R8, 5 stitches apart.
Rnd 13: dec x 6 (6)
Tie off, leaving 6′ tail. Use tapestry needle to sew the hole shut and secure end.
Body
With brown yarn.
Begin by holding the head upside down and face pointing away from you/
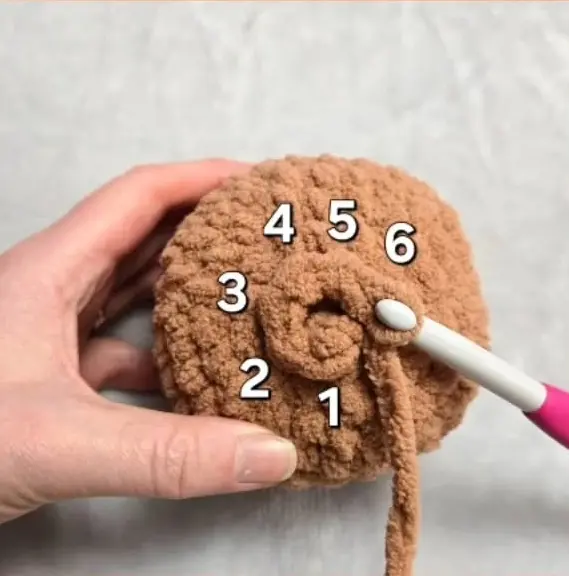
Note: you will be placing 6 sc into the bottom of the head (using round 13 as a guide for stitch placement)
You will start the row at the back of the head.
Rnd 1: 6 sc into head (6)
Rnd 2: hdc inc x 6 (12)
Rnd 3: (1 hdc, hdc inc) x 6 (18)
Rnd 4: (2 hdc, hdc inc) x 6 (24)
Rnd 5: hdc around (24)
Rnd 6: (3 hdc, hdc inc) x 6 (30)
Rnd 7-8: hdc around (30)
Rnd 9: (3 hdc, hdc dec) x 6 (24)
Rnd 10: (2 hdc, hdc dec) x 6 (18)
Do not tie off, continue to leg instructions.
Legs
Add extra hdc until you get to the centre of the back.
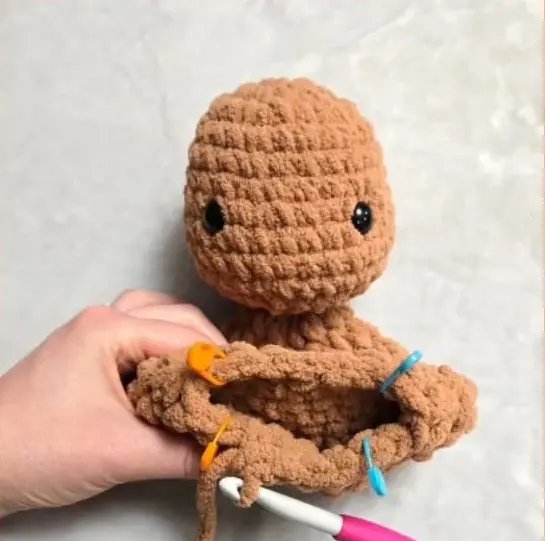
Lay the body flat to figureout how to place the legs (thre will be 5 stitches designated for each leg, that will leave 8 stitches total unworked)
Using stitch markers, mark 5 stitches for each leg, with a 4 stitch gap in between on each side. Add extra hdc to get to the first st marker, if needed.
First Leg
Working the designated 5 stitches only:
Rnd 1: sc inc x 5 (10)
Rnd 2: 7 sc, (FLO inc x 2), 1 sc (12)
Rnd 3: 1 sc, (BLO dec x 2), 2 sc, (FLO sc 3), sc 2 (10)
Rnd 4: sc around (10)
Rnd 5: (3 sc, dec) x 2 (8)
Rnd 6: (2 sc, dec) x 2 (6)
Fasten off and sew hole shut.
Second Leg
Add brown yarn to front stitch marker on round 10 of body.
Rnd 1: sc inc x 5 (10)
Rnd 2: sc 1, (FLO inc x 2), sc 7 (12)
Rnd 3: sc 2, (FLO sc 3), sc 2, (BLO dec 2), sc 1 (10)
Rnd 4: sc around (10)
Rnd 5: (dec, sc 3) x 2 (8)
Rnd 6: (dec, sc 2) x 2 (6)
Fasten off and sew hole shut.
Use the 10″ tail to sew the gap between the legs.
Nose
Sew black yarn around centre stitch of round 8 and 9 between eyes.
Arms x2
With brown yarn.
Rnd 1: 5 hdc in a Mr (5)
Rnd 2-4: hdc around (5)
Rnd 5: hdc 3, hdc dec (4)
Fasten off and leave a long tail to sew onto the body. Sew onto round 2 of the body, 4 stitches apart on the front.
Ears x2
With brown yarn.
Rnd 1: 6 sc in a Mr (6)
Rnd 2: (2 sc, inc) x 2 (8)
Rnd 3: (3 sc, inc) x 2 (10)
Rnd 4: 1 sc, dark brown sc 1, sc 1, inc x 2, sc 3, inc x 2 (14)
Rnd 5: dark brown sc 3, sc 11 (14)
Rnd 6: dark brown sc 3, sc 11 (14)
Rnd 7: dark brown sc 3, sc 1, dec, sc 5, dec, sc 1 (12)
Rnd 8: sc 1, dark brown sc 1, sc 2, dec, sc 4, dec (10)
Rnd 9: (sc 3, dec) x 2 (8)
Rnd 10: (sc 2, dec) x 2 (6)
Fasten off and leave a long tail to sew onto the head. Sew between round 3 and 4 on either side of the head.
Tail
With almond yarn.
Rnd 1: 5 sc in a Mr (5)
Rnd 2: 4 sc, inc (6)
Rnd 3: (1 sc, inc) x 3 (9)
Rnd 4: (2 sc, inc) x 3 (12)
Rnd 5: (2 sc, brown sc 1, inc) x 3 (15)
Rnd 6: (1 sc, brown sc 3, inc) x 3 (18)
Rnd 7: (brown sc 2, inc, sc 2, inc) x 2, (brown sc 2, inc) x 2 (24)
Working only in brown now:
Rnd 8: (3 sc, inc) x 6 (30)
Rnd 9-10: sc around (30)
Rnd 11: (8 sc, dec) x 3 (27)
Rnd 12: sc around (27)
Rnd 13: (7 sc, dec) x 3 (24)
Rnd 14: sc around (24)
Rnd 15: (2 sc, dec) x 6 (18)
Rnd 16: sc around (18)
Rnd 17: (1 sc, dec) x 6 (12)
Rnd 18: sc around (12)
Rnd 19: (1 sc, dec) x 4 (8)
Stuff lightly so tail holds its shape. Fasten off and sew onto back of body between rounds 7 and 8.
Collar
Begin by holding the head towards you.
Note: you will be placing 6 sc into round 1 of the body. You will start the row at the back of the head.
With almond yarn:
Rnd 1: 6 sc around round 1 of the body (6)
Mar the 2 front stitches for the front collar point. The 2 stitches on either side of these marked stitches will be for the other 2 collar points, mark these with different colors. You will have 3 sets of 2 marked stitches.
You will start at the first marked stitch of a set. If needed, sl st to get there.
Rnd 2: in the first stitch: [sc, hdc, dc, picot2], in the next stitch: [dc, hdc, sc]
Repeat step 2 for the next 2 sets of stitch markers.
Sl st and fasten off. Secure and weae in ends.