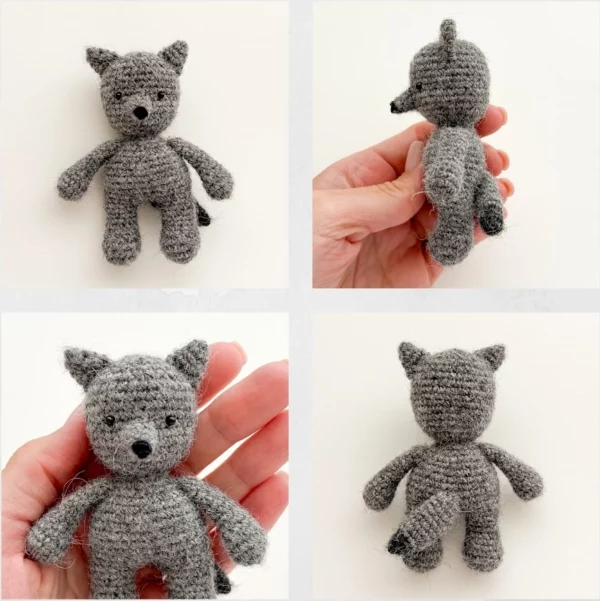
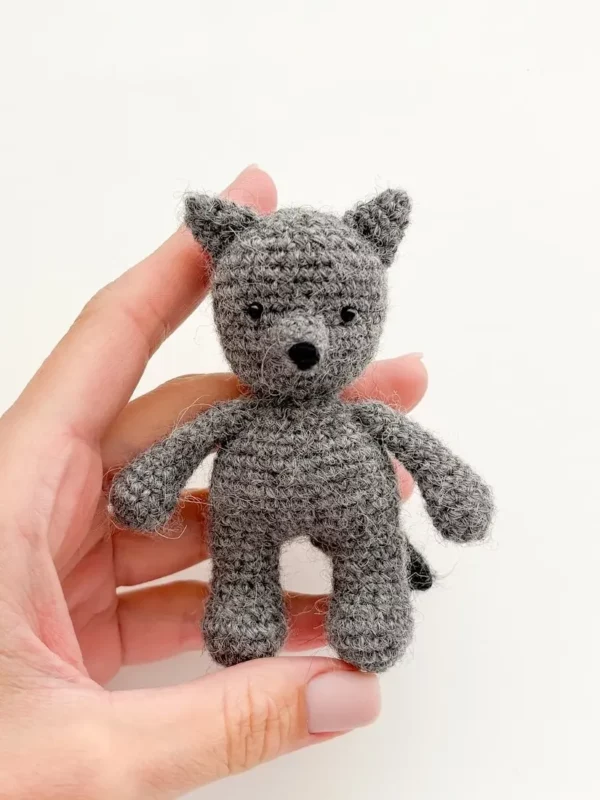
The little wolf creates an adorable woodland friend with soft ears, tiny paws, and a curious expression. It’s perfect for animal lovers, and can be used as a tiny, nursery decoration, or a thoughtful, handmade gift.
Materials needed to make this little wolf are Drops alpaca in the main grey color and in black, a 2 mm crochet hook, 3 mm safety eyes, fiberfill, black embroidery floss, and a sewing needle.
This tutorial includes how to make legs, head, ears, arms, muzzle, tail, and how to assemble all parts.
The finished toy will be approximately 10cm (4”), which makes it a cute, cuddly toy.
Designer: MiniCrochetZoo
Materials
- Yarn: Drops Alpaca (100% Alpaca, 167m/50g, fingering weight) in main (gray) color and in black color.
- 2 mm crochet hook
- 3 mm safety eyes
- Glue
- Fiberfill, sewing needle, scissors, pins
- Black embroidery floss
Abbreviations
Mr – magic ring
ch – chain
sc – single crochet
sl st – slip stitch
inc – increase
dec – decrease
Legs x2
Rnd 1: 6 sc in a Mr
Rnd 2: 6 inc (12)
Rnd 3: (1 sc, inc) x 6 (18)
Rnd 4-5:18 sc (18)
Rnd 6: 6 dec, 6 sc (12)
Rnd 7-11: 12 sc (12)
Stuff.
Cut the thread on the first leg, make the second leg similarly, do not cut the thread on the second leg.
Continue crocheting the body. Make 3 ch from the second leg.
Note: increases in the next round should be in front, on the belly. If this is not the case for you, then work them after the first leg, and not after the second leg as the pattern says.
Rnd 12: 12 sc on the frist leg, 3 sc along the chain, 12 sc on the second leg, 1 inc, 1 sc, 1 inc (32)- place marker
Rnd 13: (7 sc, inc) x 4 (36)
Rnd 14-20: 36 sc (36)
Rnd 21: (4 sc, dec) x 6 (30)
Rnd 22: 30 sc (30)
Rnd 23: (3 sc, dec) x 6 (24)
Rnd 24: (2 sc, dec) x 6 (18)
Rnd 25: (1 sc, dec) x 6 (12)
Rnd 26: 12 sc (12)
Then work the round to the middle of the back, stuff the legs and body tightly. Next we will crochet the head, do not cut the thread.
Head
Rnd 27: 12 inc (24)
Rnd 28: (1 sc, inc) x 12 (36)
Rnd 29-37: 36 sc (36)
Rnd 38: (4 sc, dec) x 6 (30)
Rnd 39: (3 sc, dec) x 6 (24)
Rnd 40: (2 sc, dec) x 6 (18)
Rnd 41: (1 sc, dec) x 6 (12) – stuff
Rnd 42: 6 dec
Cut the thread, tighten the opening with a needle grabbing the front loops of the remaining stitches, secure the thread and weave in the ends.
Ears x2
Rnd 1: 4 sc in Mr (4)
Rnd 2: (1 sc, inc) x 2 (6)
Rnd 3: (2 sc, inc) x 2 (8)
Rnd 4: (3 sc, inc) x 2 (10)
Cut the thread, leaving the end for sewing. Fold the edges of the ear together and sew them up with a needle.
Arms x2
Rnd 1: 6 sc in Mr (6)
Rnd 2: 6 inc (12)
Rnd 3-5: 12 sc (12)
Rnd 6: 3 dec, 6 sc (9)
Rnd 7-13: 9 sc (9)
Stuff the lower part of the arm. Cut the thread, leaving the end for sewing. Fold the edges of the arm together and sew them up with a needle.
Muzzle
Rnd 1: 4 sc in Mr (4)
Rnd 2: (1 sc, inc) x 2 (6)
Rnd 3: (2 sc, inc) x 2 (8)
Rnd 4: (3 sc, inc) x 2 (10)
Do not stuff. Cut the thread, leaving the end for sewing.
Tail
Start with black.
Rnd 1: 6 sc in Mr (6)
Rnd 2: 6 sc (6)
Rnd 3: (1 sc, inc) x 3 (9)
Change to gray, cut off the black thread.
Rnd 4: (2 sc, inc) x 3 (12)
Rnd 5-10: 12 sc (12)
Rnd 11: (2 sc, dec) x 3 (9)
Rnd 12: (1 sc, dec) x 3 (6)
Do not stuff. Tighten the opening with a needle grabbing the front loops of the remainin stitches; secure the thread, leaving the end for sewing.
Assembly
- Sew on the ears on the sides of the head from rounds 4 to 7 (count from the crown)
- Using black embroidery floss, embroider a nose on the tip of the muzzle (in the first round). Then sew the muzzle to the head between rounds 11 and 13.
- Glue the eyes between rounds 10 and 11, leaving about 5 stitches between them (or adjust the position to your liking)
- Sew on the arms one rond lower the neck.
- Sew the tail to the back of the toy. Attach slightly at an angle, approximately at rounds 14-15 of the body.