
This tutorial is a quick and simple project, ideal for practicing amigurumi while creating a festive pumpkin that’s great for Halloween or autumn displays.
It’s completely customizable, you can make it as big or as small as you like! It’s perfect for using up yarn scraps and doesn’t require a lot of time.
Using basic crochet stitches like single crochet stitches, double crochet stitches, and magic ring, it can be whipped up in 30 minutes for small sizes.
This pattern works in continuous rounds, so don’t forget to put a stitch marker in the first stitch to avoid losing the first stitch.
Designer: Crochet by Janina
Materials & Tools
- Chenille Size 6 yarn in orange, green and brown
- Black cotton yarn for the mouth
- 8 mm safety eyes
- 5 mm crochet hook
- Yarn needle
- Stitch marker
- Scissors
- Fiberfill
Abbreviations
st(s) – stitches
sc – single crochet
sl st – slip stitch
mr – magic ring
yo – yarn over
dc – double crochet
ch – chain
FO – fasten off
Pumpkin
Start with orange yarn.
Rnd 1: 6 sc in Mr (6)
Rnd 2: inc around x 6 (12)
Rnd 3: (sc, inc) x 6 (18)
Rnd 4-7: sc around (4 rounds) (18)
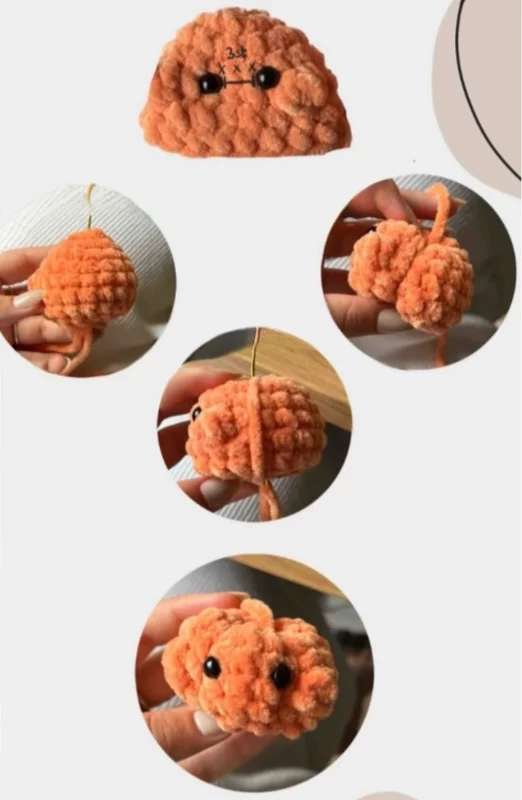
Place safety eyes between round 4 and 5, three stitches apart. Stuff the pumpkin firmly.
Rnd 8: (sc, dec) x 6 (12)
Rnd 9: dec around x 6 (6)
FO. Leave an extra long tail. Sew the hole closed.
Draw your needle through the bottom center and bring it to the top center. Draw the long yarn tail around the pumpkin and insert the needle into the bottom again and out through the top. Pull tight. This is how to make the lines that define the pumpkin.
Repeat this as many times, as you like.
Stem
Insert your hook into a random st of the pumpkins top and pull a loop of brown yarn.
Ch 3, from the 2nd ch from the hook: 2 sl st, sl st into the initial st of the body and FO. Weave in the ends.
Leaves
Insert your hook into a random st of the pumpkins top (st next to the stem) and pull a loop of green yarn.
Ch 12, from the 2nd ch from the hook: 11 dc, sl st into the inital st of the body and FO. Weave in the ends.
