
Say hello to Andy Acorn, a charming handmade crochet creation, bursting with fun and creativity!
Use this pattern to craft adorable acorns for decorating your space, from charming ornaments to whimsical garlands and captivating table centerpieces, or as an addition to children’s play sets.
This tutorial consists of three parts: body, cap, and leaf. After you have crocheted all the pieces, you need to assemble them.
Stitches needed to finish the tutorial are the single crochet stitch, double crochet stitch, half double crochet stitch, bobble stitch, and some crochet techniques like increasing and decreasing.
Designer: Crafty Emmi
Materials
- 2.5 mm crochet hook
- Sport weight yarn (color A: camel, color B: taupe, color C: olive)
- Oval black eyes (length: 6 mm)
- Polyester fiberfill
Abbreviations
st – stitch
ch – chain
sl st – slip stitch
sc – single crochet
hdc – half double crochet
dc – double crochet
bobble – bobble stitch
sc2tog – 2 st together with sc (decrease)
Bobble stitch – begin the bobble stitch by *yarn over, insert hook into indicated stitch/space, yarn over and pull up a loop. Yarn over again and pull through two loops.*
Repeat from * to * four times into the same stitch/space and complete by yarn over and pull through all loops on hook.

Body
Color A,
Rnd 1: 6 sc in Mr (6)
Rnd 2: (2 sc in next sc) x 6 (12)
Rnd 3: (2 sc in next sc, 1 sc) x 6 (18)
Rnd 4: (2 sc in next sc, 2 sc) x 6 (24)
Rnd 5: 24 sc (24)
Rnd 6: (2 sc in next sc, 2 sc) x 8 (32)
Rnd 7-10: 32 sc (32)
Place the eyes betweeb rnd 8 and 9, 5 st apart,
Rnd 11: (2 sc in next sc, 7 sc) x 4 (36)
Rnd 12-13: 36 sc (36)
Rnd 14: (sc2tog, 7 sc) x 4 (32)
Rnd 15: (sc2tog, 6 sc) x 4 (28)
Rnd 16: (sc2tog, 5 sc) x 4 (24)
Rnd 17: 24 sc (24)
Rnd 18: (sc2tog, 2 sc) x 6 (18)
Rnd 19: (sc2tog, 1 sc) x 6 (12)
Rnd 20: sc2tog x 6 (6)
Fasten off.
Cap
Color B.
Rnd 1: magic ribg with ch 2, 8 hdc, sl st in second ch of initial ch 2
Rnd 2: ch 3m (bobble in next hdc, ch 2) x 7, bobble in next hdc, sl st in third ch of initial ch 3
Rnd 3: ch 3, (bobble in next bobble, ch 1, bobble in next ch-space, ch 1) x 7, bobble in last bobble, ch 1, sl st in third ch initial of ch 3
Rnd 4: sl st in next bobble, sl st in next ch-space, ch 3, bobble in same ch-space, ch 1, (bobble in next ch-space, ch 1) x 14, sl st in third ch of ch 3, fasten off
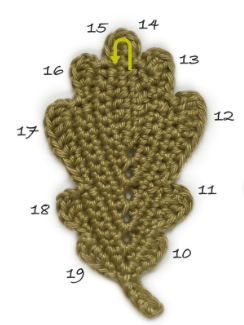
Leaf
Color C.

The base for the leaf shape is created in steps 1-9
1. (leave a long tail for sewing, make ch 10 and start in second ch from hook) sc in next 4 ch, hdc in next ch, dc in next 2 ch, hdc in next ch, 2 sc + ch 3 + 2 sc in last ch
2. (work into the other side of ch) hdc in next ch, dc in next 2 ch, hdc in next ch, sc in next ch, skip next 3 ch, turn
3. ch 1, sc in next 7 st, 2 sc + ch 3 + 2 sc in ch-space, sc in next 7 st, skip next 3 sc, turn
4. ch 1, sc in next 9 sc, 2 sc + ch 3 + 2 sc in ch-space, sc in next 6 sc, skip next 3 sc, turn
5. ch 1, sc in next 8 sc, 2 sc + ch 3 + 2 sc in ch-space, sc in next 8 sc, skip next 3 sc, turn
6. ch 1, sc in next 10 sc, 2 sc + ch 3 + 2 sc in ch-space, sc in next 3 sc, skip next 7 sc, turn
7. ch 1, sc in next 5 sc, 2 sc + ch 3 + 2 sc in ch-space, sc in next 5 sc, skip next 7 sc, turn
8. ch 1, sc in next 7 sc
The stem is made in step 9:
9. sc in ch-space, ch 5, (start in second ch from hook) sc in next 4 ch, sc in ch-space again
In steps 10-19, the curves are crocheted that give the typical shape of an oak leaf.
10. sc in next sc, hdc in next sc, 2 hdc + ch 1 + sl st in next sc
11. sl st in next sc, sc in next sc, hdc in next sc, 2 dc + ch 2 + sl st in next sc
12. (two rows down) sl st in next sc, sc in next sc, hdc in next 3 sc, dc in next sc, 3 dc + ch 2+ sl st in next sc
13. (two rows down) sl st in next sc, sc in next sc, hdc + 2 dc + ch 2 + sl st in next sc
14. (two rows down, st = loop of skipped ch in step 2) sl st in next st, sc in next st, 2 sc in next st
Rotate and continue on the opposite side, do steps 15-19:
15. 2 sc in next sc, sc in next sc, sl st in next sc
16. (two rows up) sl st + ch 2 + 2 dc + hdc in next sc, sc in next sc, sl st in next sc
17. (two rows up) sl st + ch 2 + 3 dc in next sc, dc in next sc, hdc in next 3 sc, sc in next sc, sl st in next sc
18. (two rows up) sl st + ch 2 + 2 dc next sc, hdc in next sc, sc in next sc, sl st in next sc
19. sl st + ch 1 + 2 hdc in next sc, hdc in next sc, sc in next sc, sl st in next sc, fasten off.
Assembly
Fix the leaf in the center of the cap with a few stitches and place the cap on the head.
(if its tii loose, sew the cap on the body in rnd 14.
