The post Cute Gengar Pokemon Amigurumi Free Pattern appeared first on Yarn Gems.
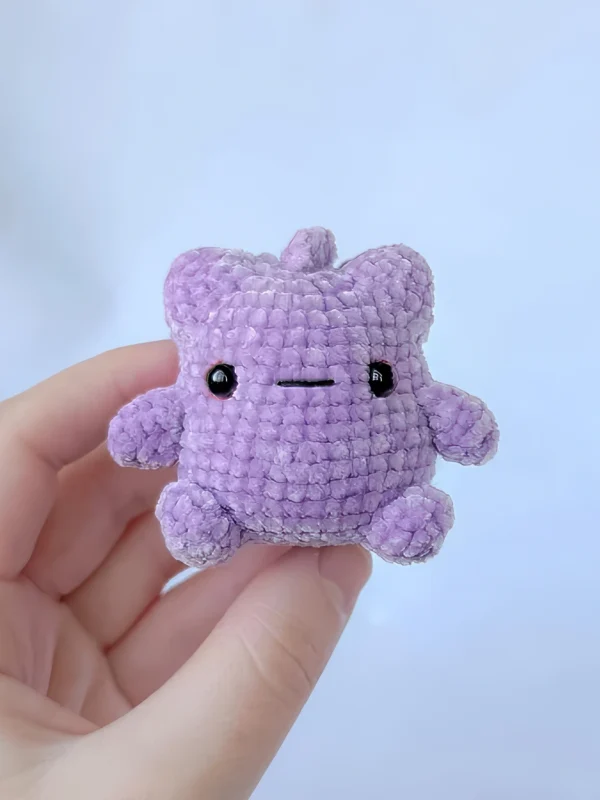
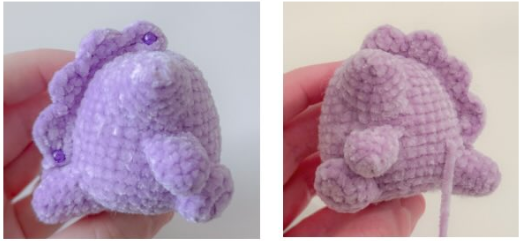
]]>This cute Gengar amigurumi toy, inspired by the beloved Pokemon character, can be made with different colors and decorate your shelf with it.
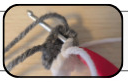
It’s made using purple velvet yarn (size 4), 2.75mm crochet hook, safety eyes, fiberfill, black and red thread, tapestry needle, and stitch markers.
Stitches used in this tutorial are so simple and easy, like single crochet stitches, half double crochet, double crochet, and some crochet techniques like increasing and decreasing.
This tutorial starts by working on the body, ears, feet, arms, tail, spikes, long spike, and short spikes, then assemble all parts at the end.
Materials
- 2.75 mm crochet hook
- Purple velvet yarn (size 4)
- Safety eyes
- Polyfill stuffing
- Stitch marker
- Tapestry needle
- Scissors
- Black and red thread
Abbreviations
Mr – magic ring
sc – single crochet
inc – increase
dec – decrease
ch – chain
hdc – half double crochet
dc – double crochet
sl st – slip stitch
Body
Rnd 1: 8 sc in Mr (8)
Rnd 2: inc around (16)
Rnd 3: (1 sc, 1 inc) x 8 (24)
Rnd 4: (2 sc, 1 inc) x 8 (32)
Rnd 5-7: sc around (32) (3 rounds)
Rnd 8: (7 sc, 1 inc) x 4 (36)
Rnd 9-11: sc around (36) (3 rounds)
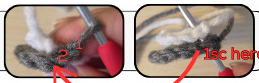
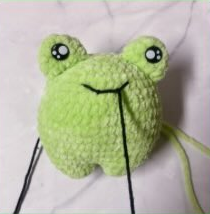
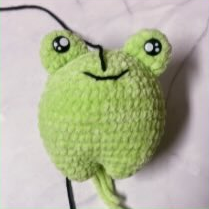
Place eyes between rows 8-9, 5/6 stitches apart.
Rnd 12: (8 sc, 1 inc) x 4 (40)
Rnd 13-15: sc around (40) (3 rounds)
Stuff firmly.
Rnd 16: (6 sc, 1 dec) x 5 (35)
Rnd 17: (3 sc, 1 dec) x 7 (28)
Rnd 18: (2 sc, 1 dec) x 7 (21)
Rnd 19: (1 sc, 1 dec) x 7 (14)
Rnd 20: dec x 7 (7)
Fasten off, sew hole closed.
Ears x2
Rnd 1: 6 sc in Mr (6)
Rnd 2: (1 sc, 1 inc) x 3 (9)
Rnd 3: sc around (9)
Rnd 4: (2 sc, 1 inc) x 3 (12)
Stuff firmly.
Fasten off, leave a long tail for sewing.
Feets x2
Rnd 1: 5 sc in Mr (5)
Rnd 2: inc around (10)
Rnd 3: sc around (10)
Rnd 4: 4 sc, 1 dec, 4 sc (9)
Rnd 5: 4 sc, 1 dec, 3 sc (8)
Do not stuff.
Fasten off, leave a long tail for sewing.
Arms x2
Rnd 1: 4 sc in Mr (4)
Rnd 2: inc around (8)
Rnd 3-5: sc around (8) (3 rows)
Stuff lightly.
Fasten off, leave a long tail for sewing.
Tail
Rnd 1: 6 sc in Mr (6)
Rnd 2: (1 sc, 1 inc) x 3 (9)
Rnd 3: sc around (9)
Rnd 4: (2 sc, 1 inc) x 3 (12)
Rnd 5: sc around (12)
Rnd 6: (3 sc, 1 inc) x 3 (15)
Stuff firmly.
Fasten off, leave a long tail for sewing.
Assembly
- Sew ears between rows 2-8. Using row 3 as a guide, the ears should be sewn around 8 stitches apart.
- Before sewing the arms to the body, sew the opening closed.
- Sew arms between rows 10-11. Sew along the arm so it’s securedto the body (the arms should be sewn slightly in front of the ears)
- Sew legs between row 14-18. The legs should be sewn 2-3 stitches in front of the arms. Ensure that the legs are not stuffed.
- Once the leg has been secured to the body, pull the needle through the front of the leg, re-insert the needle back into the leg and pull through. THe leg should now be more flush against the body.
- Sew the tail between rows 13-17, the tail should be stuffed firmly.
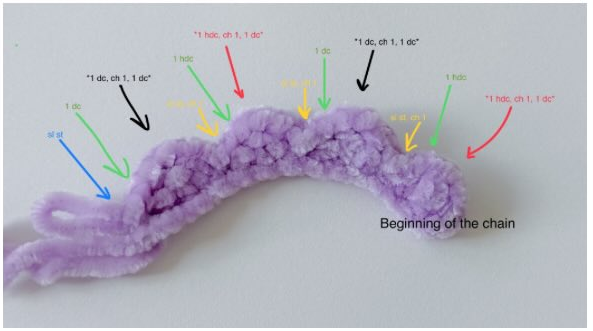
Spikes x3
Depending on the actual size of your plush you may need to alter the amount of single crochets in the chains. Continue the pattern of double crochet/half double crochet to create the triangular spike shape.
Certain steps are repeated in the same stitch to create the triangular shape of a “spike”. Stitches that should be completed in the same stitch will be bracketed by asterisks. Emaple *2 hdc, 1 sl st*, both the hdc and sl st should be completed in the same stitch.
Long Spike
Step 1: ch 14, in the second stitch from you hook, *1 hdc, ch 1, 1 dc*, 1 hdc, *sl st, ch 1*, *1 dc, ch1, 1 dc*, 1 dc, *sl st, ch 1* x 2, sl st once at the end of the chain, do not sl st and ch 1
Fasten off, leave a long tail for sewing.
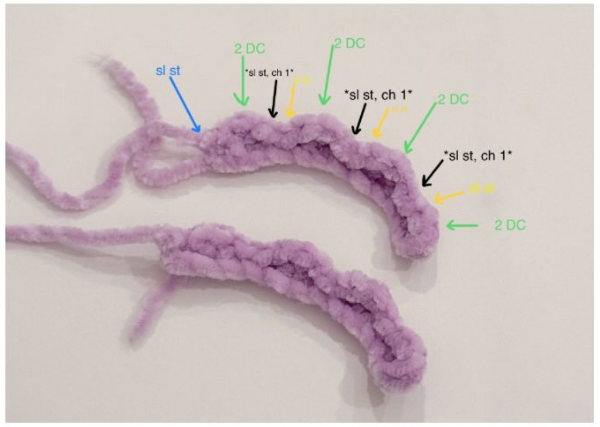
Short Spikes x2
Step 1: ch 12, in the second stitch from your hook, *2 dc*, sl st, *sl st, ch 1* x 3, sl st once at the end of the chain
Fasten off, leave long tail for sewing.
Assembly
- Align the long spike between the ears starting at row 1 of the body. The end of the chain so rest at the top of the tail on row 13.
- To define the spikes, sew over the sl st/section between the spikes to create a more triangular shape.
- Sew the short spikes directly behind the ears (row 3) at a slight angle.
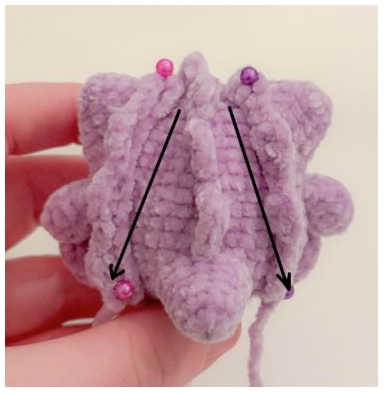
- The end of the chain should be slightly level/below the tail on row 17.
- Define the shorter spikes by using the same method that was used for the longer spikes.
Finishing Details
- (Optional) To add dimension to the plush shape the eyes. Begin with a new strand of purple yarn. Enter your needle into a random stitch in the body, pull the needle out of the body near the bottom corner of the eye. Re-enter the needle near the top corner of the eye, pulling tightly. Repeat the previous steps on the other eye.
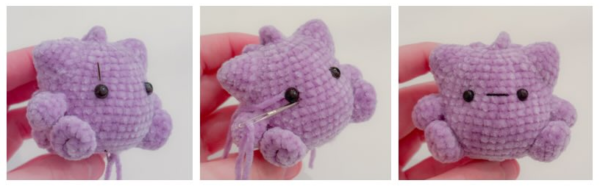
- (Optional) To add color to the eyes begin with a strand of red thread. Enter your needle into a random stitch in the body, pull the needle out of the body near the bottom corner of the eye. Re-enter the needle near the top corner of the eye, pull gently until the thread rests around the eye. Repeat the previous steps on the other eye.
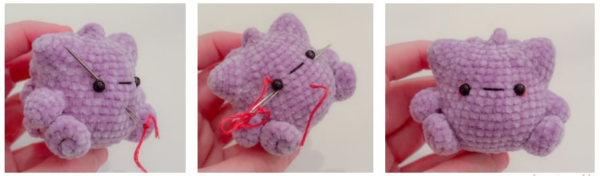
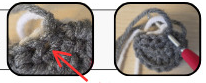
- Using black thread, sew a smug smile between the eyes between rows 8-9.
The post Cute Gengar Pokemon Amigurumi Free Pattern appeared first on Yarn Gems.
]]>