
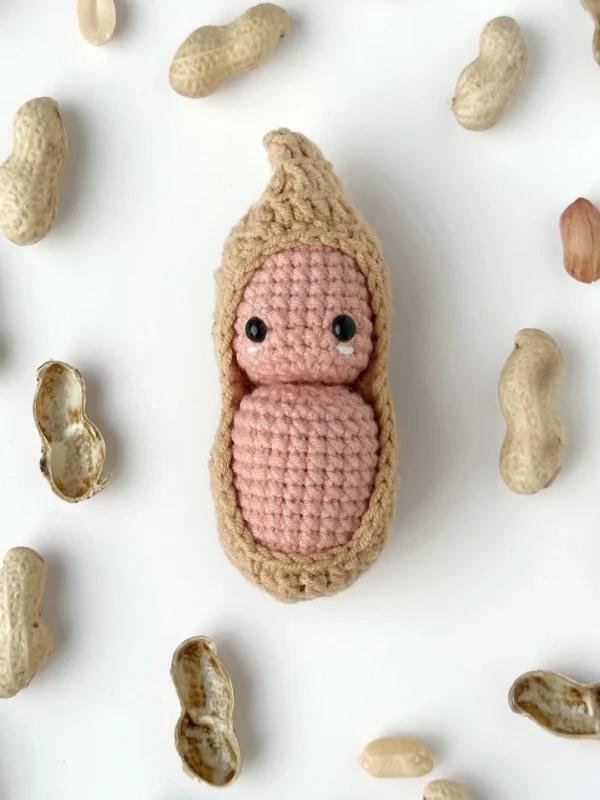
Add to your forest collection this cool crochet peanut! Please note that this pattern is for experienced crocheters and it uses some advanced techniques like dc-dec and hdc-dc, but the rest is quite simple.
This tutorial includes instructions on how to crochet the two peanut parts and the shell (it is worked both in rounds and in rows) and how to join all pieces together. You can customize the pattern by using different colors or by adding a small smile, so your peanuts can all look a little different.
Materials needed are a 2.5 mm crochet hook and 4-ply size 2 yarn in three colors, stuffing, a yarn needle, and safety eyes.
This pattern is a great choice for nature or forest-themed decor, as a toy, or as a handmade gift for peanut and nature lovers.
Designer: FloeCreation Crochet
Materials
- 2.5 mm crochet hook
- 60% cotton + 40% acrylic 4-ply size 2 (sport weight) yarn in colors:
- Pink, light brown, cream
- Stuffing
- Yarn needle
- Scissors
- 5 mm safety eyes
- Stitch marker
Size: 4 cm x 9 cm
Abbreviations
Mr – magic ring
sc – single crochet
dc – double crochet
hdc – half double crochet
inc – increase
dec – decrease
ch – chain
sl st – slip stitch
[…] – crochet in the same stitch
(…) – repeat … n times
dc-dec – make 1 unfinished dc: hook the yarn, insert into stitch, pull up a loop, hook yarn, pulll through 2 loops, 2 loops left on the hook. Make another unfinished dc in the next stitch: hook the yarn, insert into stitch, pull up a loop, hook yarn, pull through 2 loops. Now you have 3 loops on your hook. Hook the yarn and pull through all of them.
hdc-dc – make 1 unfinished hdc: hook the yarn, insert into stitch, pull up a loop. 3 loops left on the hook. Make another unfinished hdc in the next stitch: hook the yarn, insert into stitch, pull up a loop. Now you have 5 loops on your hook. Hook the yarn and pull through all of them.
Important: this pattern uses the joined rounds technique. This is where each round of your project will start with a ch 1 if the starting stitch is sc (or ch 2 for hdc or dc) and end with a slip stitch joining to the 1st stitch of the round. Chains at the beginning of the rows/rounds do not count toward the total stitch count.
Peanut #1
Pink, cream (embroidering) yarn.
Rnd 1: Mr, 6 sc into the ring (6)
Rnd 2: [ch 1, sc], (inc, sc) x 2, inc (9)
Rnd 3: [ch 1, sc], (inc, 2 sc) x 2, inc, sc (12)
Rnd 4: [ch 1, sc], (inc, sc) x 5, inc (18)
Rnd 5: [ch 1, sc], (inc, 2 sc) x 5, inc, sc (24)
Rnd 6-13: [ch 1, sc], 23 sc (8 rounds) (24)
Stuff as you go. Insert safety eyes between R11 and R12, about 4 stitch holes apart. Use cream color yarn to embroider 2 lines of blushes under the eyes.
Rnd 14: [ch 1, sc], (dec, sc) x 7, dec (16)
Rnd 15: [ch 1, dec], 7 dec (8)
Fasten off through the front loops of R15 to close the opening.
Peanut #2
Pink yarn.
Rnd 1: Mr, 8 sc into the ring (8)
Rnd 2: [ch 1, inc], 7 inc (16)
Rnd 3: [ch 1, sc], (inc, sc) x 7, inc (24)
Rnd 4-13: [ch 1, sc], 23 sc (10 rounds) (24)
Stuff as you go.
Rnd 14: [ch 1, sc], (dec, sc) x 7, dec (16)
Rnd 15: [ch 1, dec], 7 dec (8)
Fasten off through the front loops of Rnd 15 to close the opening.
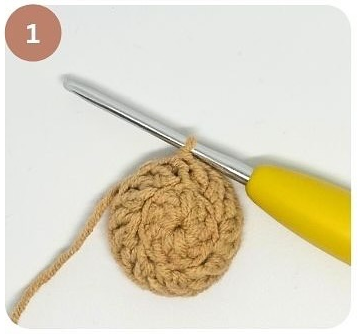
Shell
Light brown yarn. The shell is worked from bottom up.
Rnd 1: Mr, ch 2, 8 sc into the ring (8)
Rnd 2: BLO [ch 2, dc-inc], dc-inc x7
Rnd 3: BLO [ch 2, dc], (dc-inc, dc) x 5, dc-inc, omit the remaining 4 stitches.
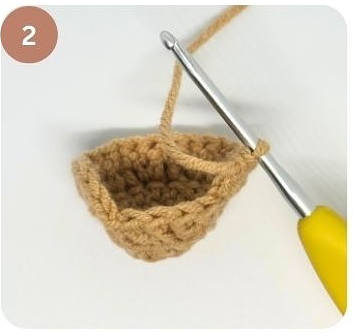
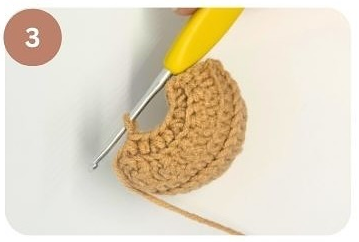
Turn your work. From here, you will work in rows, turn at the end of each row. The ridges made by the FLO & BLO will show on the outside of the shell.
Row 4: FLO [ch 2, dc], 17 dc, turn (18)
Row 5: BLO [ch 2, dc], 17 dc, turn (18)
Row 6: FLO [ch 2, dc], (dc-dec, dc) x 5, dc-dec, turn (12)
Row 7: BLO [ch 2, hdc], (hdc-dec, hdc) x 3, hdc-dec, turn (8)
Row 8: FLO [ch , hdc], (hdc-inc, hdc) x 3, hdc-inc, turn (12)
Row 9: BLO [ch 2, dc], (dc-inc, dc) x 5, dc-inc, turn
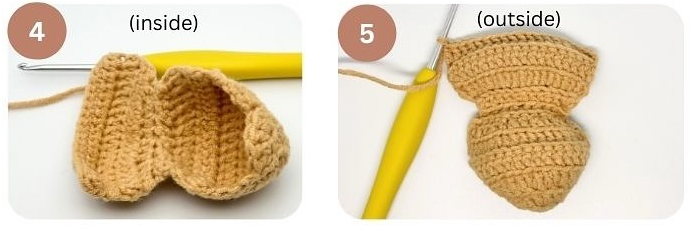
Row 10: FLO [ch 2, dc], 17 dc, turn (18)
Row 11: BLO [ch 2, dc], 17 dc, ch 4, sl st to join with the 1st stitch of the row (22)
After joining with the 1st stitch of the row, you form a round. Continue in the same direction, work in rounds form here.
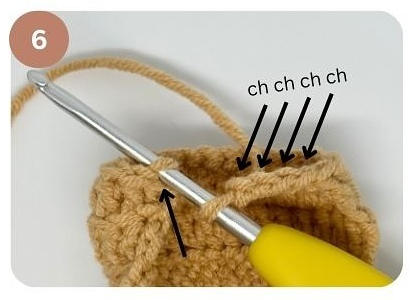
Rnd 12: BLO [ch 2, dc], (dc-dec, dc) x 5, dc-dec, 4 dc on the ch stitches (16)
Rnd 13: BLO [ch 2, dc], (dc, dc-dec, dc) x 3, dc, dc-dec (12)
Rnd 14: BLO [ch 2, dc-dec], (dc-dec) x 5 (6)
Fasten off through the front loops of rnd 14 to close the opening.
With light brown yarn, outline the shell opening with sc around. Make 2 sc adjacent to a dc, and make 1 sc adjacent to a hdc. You will end up with around 42 stitches.
Fasten off invisibly to the beginning of the round.
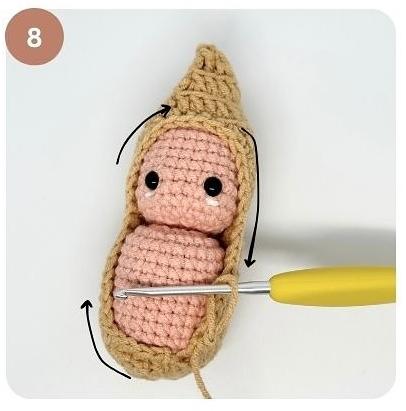
Place the peanuts inside the shell.
