
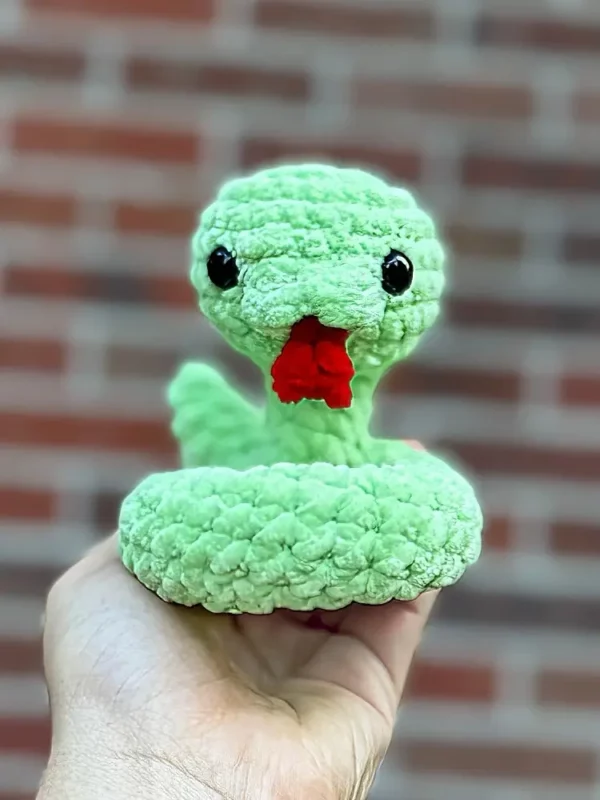
Meet your new slithery friend! This handmade crochet snake is soft and full of personality. It uses US terminology and worked in continuous rounds, so you need to place a stitch marker in the first stitch of each round to keep your place.
Materials used in this tutorial are Parfait chunky yarn in key lime and coral, 5&5.5 mm crochet hooks, some scrap amount of red or pink yarn for tongue, 10 mm safety eyes, stuffing, 14 inches of craft wire inserted into the head, trimmed before you close the tail.
It’s perfect for brightening up a nursery, adding charm to a shelf, or joining your collection of handmade amigurumi.
Designer: Amigurumi by Kylie
Materials
- 1/2 Skein of the body color (Premier Parfait Chunky in Key Lima and Coral)
- 5.5 and 5 mm crochet hooks
- A scrap ammount of red or pin fot the tongue color (Premer Parfait Chunky in Candy Apple)
- 14 inches of craft wire (pipe cleaners)
- 10 mm safety eyes
- Polyfil stuffing
- Yarn needle
- Stitch markers
Notes: this pattern requires you to crochet around a lenght of craft wire. The wire will be inserted into the head, trimmed before you close the tail, and then manipulated to create the snake’s coil. You may wish to weave 2 or ever 3 strands together depending on the thickness of wire.
Abbreviations
Mr – magic ring
sc – single crochet
inc – increase
dec – decrease
ch – chain
sl st – slip stitch
hdc – half double crochet
hdc inc – half double crochet increase
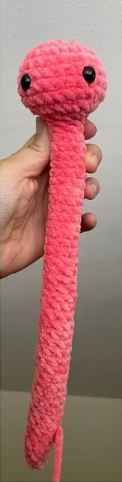
Body
Starting in body color. Use a 5.5 mm hook.
Rnd 1: 8 sc in Mr (8)
Rnd 2: 8 inc (16)
Rnd 3: (sc, inc) x 8 (24)
Rnd 4-7: 24 sc (24) (4 rounds)
Rnd 8: (sc, dec) x 8 (16)
Stuff the head firmly. Insert your safety eyes between rounds 5 and 6, about 6 stitches apart.
Rnd 9: 8 dec (8)
Bend the end of your wire to form a tiny “hook” that will anchor it into the stuffing. Insert the craft wire into the head and begin crocheting around it. Stuff as you go.
Rnd 10-50: 8 sc (8) (41 rounds)
Rnd 51: 4 dec (4)
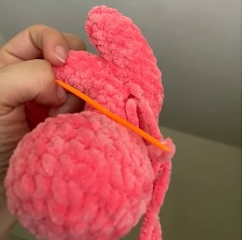
Fasten off and leave a very long tail for sewing. Close the hole and weave your tail up to R47. We will use this tail later to sew the body into its circular shape.
We will now manipulate the wire to achieve the shape. First make a 90 deg crease at R13 to form the neck, ensuring the the eyes are facing forward.
Next you will shape the wire into a coil that wraps around to the back. It will most likely not stay perferctly in shape until you sew the tail to the body.
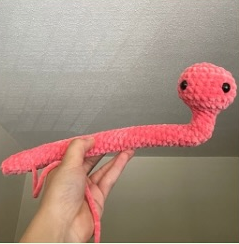
Bring your yarn tail at R47 around and line it up with R15. Use your tail to sew one stitch from R47 to one stitch from R15. You will then continue sewing in this way for 3 more rounds: one stitch from R46 to R14, one stitch from R45 to R13, one stitch from R44 to R12. Weave your end in securely, in multiple directions.
Finally, bend the end of the tail so that is sticks up behind the body.
Tongue
Switch to 5 mm hook. Starting in toungue color.
Rnd 1: ch 4. Starting in the 2nd ch from your hook, sl st. ch 2. sl st in the 2nd ch from your hook. Then, 2 sl st down the 2 unworked stitches on the original chain to get back to your starting ch. Fasten off and leave a tail for sewing.
Sew the tongue between R5-6, centered between the eyes.
Mouth
Use body color and a 5.5 mm hook. If you have loose tension, you may wish to use a 5 mm hook.
Rnd 1: ch 3. Starting in the 2nd ch from you hook, [hdc inc, sl st] in the same ch. In the next ch, [sl st, hdc inc, sl st] in the same ch. Fasten off and leave a tail for sewing. Weave in your beginning tail or use it to help secure the mouth to the face.
Sew the top edge of the mouth to R5 so that the hdcs drape over the top of the tongue. Hide your ends.
