Designer: Redmills Crochet
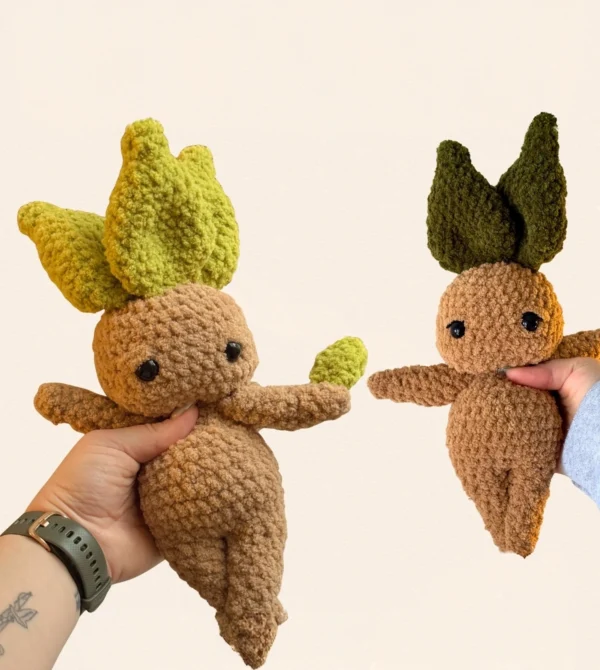
This crochet mandrake is carefully handmade with soft yarn and charming details inspired by a magical plant. It brings a magical and imaginative touch to any handmade collection.
This tutorial is worked in continuous rounds, so don’t use a slip stitch and use a stitch marker to help you know where the beginning end of the rounds.
Materials needed to make this cute mandrake are 2 colors of Alize softy plus yarn, a 4mm crochet hook, 14 mm safety eyes, stuffing, a tapestry needle, stitch markers, and scissors.
You can use it as a magical themed decor, a unique handmade gift for fantasy lovers, a playful accent for a plant or nature themed setup.
Materials
- 2 colors yarn Alize Softy Plus
- 4.00 mm crochet hook
- 14 mm safety eyes
- Fiberfill
- Yarn needle
- Scissors
- Stitch markers
- Pink yarn or marker for blush
Abbreviations
rnd – round
ch – chain
inc – increase
dec – decrease
sl st – slip stitch
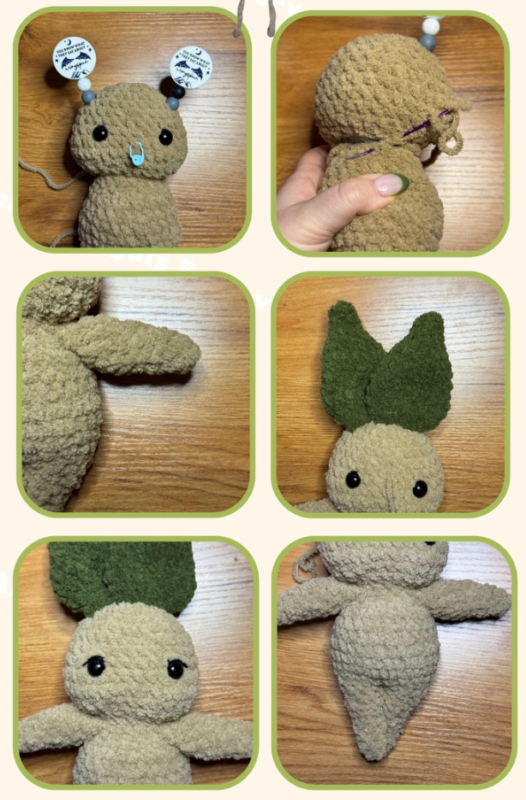
Legs x2
Rnd 1: ch 2, 3 sc into the 2nd chain from the hook (3)
Rnd 2: 2 sc, inc (4)
Rnd 3: 4 sc around (4)
Rnd 4: 3 sc, inc (5)
Rnd 5: 4 sc, inc (6)
Rnd 6: 6 sc around (6)
Rnd 7: 5 sc, inc (7)
Rnd 8: 6 sc, inc (8)
Rnd 9: 8 sc around (8)
Rnd 10: (3 sc, inc) x 2 (10)
Rnd 11: (4 sc, inc) x 2 (12)
Fasten off first, but not 2nd, we will continue on to the body.
Stuff the legs and then sruff/shape the body as you go. You can leave a long tail from leg one to optionally sew the legs togerher at the end.
Body
Continuing from leg 2.
Stuff and shape as you go.
Rnd 1: connect the two legs with a sc from leg 2 into leg1, continue with 11 more sc around leg 1, then 12 sc around leg 2 (24)
increases in the next round should be centered on the front of the body.
Rnd 2: 9 sc, 6 inc, 9 sc (30)
Rnd 3-5: 3 rnds of 30 sc (90 sc total)
Dec in the next round should be centered on the sides of the body.
Rnd 6: 4 sc, 3 dec, 10 sc, 3 dec, 4 sc (24)
Rnd 7-8: 2 rnds of 24 (48 sc total)
Dec in the next round should be centered on the front of the body.
Rnd 9: 6 sc, 6 dec, 6 sc (18)
Rnd 10: (7 sc, dec) x 2 (16)
Rnd 11: 16 sc around (16)
Fasten off, no tail needed for sewing, we will leave one with the head.
The 6 inc in R2 are the bottom of the belly, they should be centered to what will be the front.
Head
Worked in rounds.
Rnd 1: ch 2, 8 sc into the 2nd chain from the hook (8)
Rnd 2: inc the rnd (16)
Rnd 3: (1 sc, inc) x 8 (24)
Rnd 4: (3 sc, inc) x 6 (30)
Rnd 5-8: 30 sc around for 4 rnds (120sc total)
Rnd 9: 3 inc, 5 sc, 3 inc, 19 sc (36)
Rnd 10: 36 sc around (36)
Rnd 11: 3 dec, 5 sc, 3 dec, 19 sc (30)
Rnd 12: (3 sc, dec) x 6 (24)
Rnd 13: (sc, dec) x 8 (16)
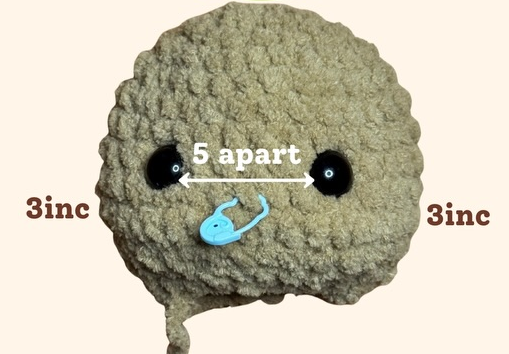
Fasten off and leave a tail for sewing to the body – insert safety eyes between rnd 8 and 9 about 5-6 stitches apart (place right over the 3rd and the 4th increases of r9)
Stuff and shape the cheeks.
Arms x2
Rnd 1: ch 2, 3 sc into the 2nd chain from the hook (3)
Rnd 2: 2 sc, inc (4)
Rnd 3: 4 sc around (4)
Rnd 4: 3 sc, inc (5)
Rnd 5: 4 sc, inc (6)
Rnd 6: 6 sc around (6)
Rnd 7: 5 sc, inc (7)
Rnd 8: 6 sc, inc (8)
Rnd 9: 8 sc around (8)
Rnd 10: (3 sc, inc) x 2 (10)
Rnd 11: 10 sc around (10)
Rnd 12: 4 dec, 2 sc (6)
Stuff lightly.
Press in half and 2-3 sc across to close the hole. Leave a tail to sew to the body.
Large Leaves x3
Rnd 1: ch 2, 4 sc into the 2nd chain from the hook (4)
Rnd 2: (sc, inc) x 2 (6)
Rnd 3: 6 sc around (6)
Rnd 4: (2 sc, inc) x 2 (8)
Rnd 5: (sc, inc) x 4 (12)
Rnd 6: (3 sc, inc) x 3 (15)
Rnd 7: (4 sc, inc) x 3 (18)
Rnd 8-9: 18 sc around for 2rnds (36 sc total)
Rnd 10: (5 sc, inc) x 3 (21)
Rnd 11: (6 sc, inc) x 3 (24)
Rnd 12: 24 sc around (24)
Rnd 13: (sc, dec) x 8 (16)
Rnd 14: 8 dec (8)
Do not stuff. Press in half and 4 sc across to close the hole.
Leave a tail to sew to the head.
Little Leaves
Rnd 1: ch 2, 4 sc into the 2nd chain from the hook (4)
Rnd 2: 4 sc around (4)
Rnd 3: 4 inc (8)
Rnd 4-5: 8 sc around for 2rnds (16 sc total)
Rnd 6: (2 sc, dec) x 2 (6)
Do not stuff. Press in half and 3 sc across to close the hole.
Leave a tail to sew to the arms.
Assembly
Head to Body
- Use the last round of the body and the last round of the head to sew th two pieces together.
- Make sure the head is centered to the front with the belly.
Arms to Body
- Find a position you’d like the arms to be in, use the last couple of sc’s to secure them to the body and a couple of the stitches on the side to further secure them if you don’t want them to be floppy.
Large Leaves to Head
- Sew the large leaves onto the top of the head.
- Position is your preference.
Small Leaves to Arms
- If you made the small leaves, sew them on to the ends of the ends of the arms like they are branches.
Finishing Touches
- Sew the legs together if you’d like.
- Feel free to add blush.