
Christmas is around the corner, it’s perfect for adding a festive, cheerful Christmas vibe without glass or spills, it’s just a cozy handmade charm.
You can customize the champagne bottle using different colors, or add a different label, or add glasses to the bottles to make a full set.
All you need to know before starting to work on this tutorial are some basic crochet stitches like the single crochet stitch, and some crochet techniques like increasing and decreasing, working in front & back loop only.
It’s suitable to use as a Christmas home décor, holiday gift, party decoration, and celebration.
Designer: OliyankoAmi
Materials
- Hobbii Honey Bunny (6 Super Bulke) in Beige, Yellow and Dark green
- 4.5 mm crochet hook
- Polyester Fiberfill
Abbreviations
Mr – magic ring
sc – single crochet
inc – increase
dec – decrease
sl st – slip stitch
ch – chain
BLO – back loops only
FLO – front loops only
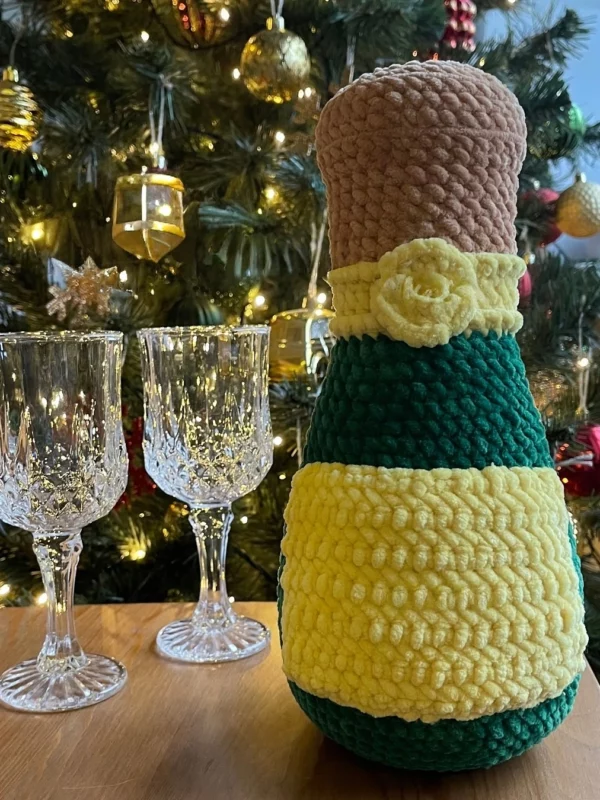
Bottle
Stuff as you go.
Rnd 1: 8 sc in a Mr (8)
Rnd 2: inc x 8 (16)
Rnd 3: (1 sc, inc) x 8 (24)
Rnd 4: (2 sc, inc) x 8 (32)
Rnd 5: (3 sc, inc) x 8 (40)
Rnd 6: (4 sc, inc) x 8 (48)
Rnd 7: (5 sc, inc) x 8 (56)
Rnd 8: BLO sc in all 56 sts (56)
Rnd 9-18: sc in all 56 sts (56) (10 rounds)
Rnd 19: (12 sc, dec) x 4 (52)
Rnd 20: sc in all 52 sts (52)
Rnd 21: (11 sc, dec) x 4 (48)
Rnd 22: sc in all 48 sts (48)
Rnd 23: 5 sc, dec, (10 sc, dec) x 3, 5 sc (44)
Rnd 24: sc in all 44 sts (44)
Rnd 25: (9 sc, dec) x 4 (40)
Rnd 26: sc in all 40 sts (40)
Rnd 27: 4 sc, dec, (8 sc, dec) x 3, 4 sc (36)
Rnd 28: sc in all 36 sts (36)
Rnd 29: (7 sc, dec) x 4 (32)
Rnd 30: sc in all 32 sts (32)
Rnd 31: 3 sc, dec, (6 sc, dec) x 3, 3 sc (28)
Change color to Yellow.
Rnd 32: FLO sc in all 28 sts (28)
Rnd 33: BLO sc in all 28 sts (28)
Rnd 34-35: sc in all 28 sts (2 rounds)
Change color to Beige.
Rnd 36: BLO sc in all 28 sts (28)
Rnd 37-41: sc in all 28 sts (28) (5 rounds)
Rnd 42: FLO (6 sc, inc) x 4 (32)
Rnd 43: 4 sc, inc, (7 sc, inc) x 3, 3 sc (36)
Rnd 44: BLO sc in all 36 sts (36)
Rnd 45-46: sc in all 36 sts (36) (2 rounds)
Rnd 47: BLO (7 sc, dec) x 4 (32)
Rnd 48: (2 sc, dec) x 8 (28)
Rnd 49: (1 sc, dec) x 8 (16)
Rnd 50: dec x 8 (8)
Finish stuffing if needed, thread the yarn through a needle and using only front loops of the last round, close the top ring tight to finish the toy.
Round Patch
Using yellow yarn.
Rnd 1: 6 sc in Mr (6)
Rnd 2: inc x 6 (12)
Rnd 3: (1 sc, inc) x 6 (18)
Fasten off and leave a long tail for sewing.
Label
Using yellow yarn.
Rnd 1: ch 21, turn
Rnd 2: sc in all 20 sts, ch 1, turn
Repeat step 2 totally 12 times, or until the label is as big as you desire.
Fasten off and leave a long tail for sewing.
Tip: instead of making ch 1 after each row, you can make the last loop larger, remove your crochet hook, turn your work, insert your crochet hook into the same loop, pull by the yarn slightly to make a loop smaller and continue crocheting as normal. including making a stitch into the same place where you are now.
Assembly
- Return to row 32 and using the loops we left behind, attach yellow yarn to one stitch and sc around the whole round.
- Return to row 35 and once again, using yellow yarn, repeat the same process. There two steps will make the “rim” around the top label.
- Sew the round patch on top of this label, making sure it’s places in the centre.
- Lastly sew the large label on, leaving approximately 7 rows between this large label and the small, top label, making sure both labels are aligned the center.
