
This amigurumi dress bunny with its nice look will be very useful to make your children happy for easter, nursery decor, and imaginative play.
Materials needed to finish this tutorial are sport weight yarn with white and pink shades, brown thread to embroider eyebrows and muzzle, pink thread to embroider the nose, 2 mm crochet hook.
You can customize this pattern using different yarn weights with a suitable crochet hook to make it in different sizes.
All you need to make this cute bunny is to know some basic crochet stitches like single crochet stitches, double crochet stitches, and some crochet techniques like increase, decrease.
Designer: Marizza Toys
Materials & Tools
- Sport yarn: White (YarnArt Jeans 62), Pink (YarnArt Jeans 74)
- Brown thread to embroider eyebrows and muzzle
- Pink thread to embroider the nose
- White thread for head sculpting
- Safety eyes 6 mm
- 2 mm crochet hook
- Stuffing (Polyerster fiber fill)
Size: 16 cm tall
Abbreviations
sc – single crochet
inc – increase
dec – decrease
Arms x2
Crochet with white yarn. Stuff only lower 2/3 of the arm.
Rnd 1: 6 sc into a magic ring (6)
Rnd 2: 6 inc (12)
Rnd 3: (3 sc, inc) x 3 (15)
Rnd 4-5: 15 sc (15)
Rnd 6: (3 sc, dec) x 3 (12)
Rnd 7-14: 12 sc (12)
Rnd 15: (4 sc, dec) x 2 (10)
Rnd 16: 10 sc (10)
Flatten the arm and crochet 5 sc through both sides. Fasten off and cut the yarn, leaving a tail for sewing.
Sew the arms two rounds under the beginning of the head.
Legs x2
Crochet with the white yarn. Stuff as you go.
Rnd 1: 7 sc into a magic ring (7)
Rnd 2: 7 inc (14)
Rnd 3: (sc, inc) x 7 (21)
Rnd 4-5: 21 sc (21)
Rnd 6: 7 sc, 4 dec, 6 sc (17)
Rnd 7: 7 sc, 2 dec, 6 sc (15)
Rnd 8-10: 15 sc (15)
Rnd 11: (4 sc, inc) x 3 (18)
Rnd 12: 18 sc (18)
Rnd 13: For the left leg: crochet only 14 sc and stop there. Fasten off and cut the yarn.
Rnd 13: For the right leg: 18 sc. Don’t cut the yarn, we will continue with the body.
Body
Continue crocheting with the white yarn:
Rnd 1: crochet additional 7-8 sc on the right leg and make 3 chain. Join the left leg (continue from where you stopped crocheting the leg) and crochet:
18 sc on the left leg; 3 sc on the chain; 18 sc on the right leg; 3 sc on the chain; place the marker here (42)
(The marker should be in the back)
Rnd 2: (6 sc, inc) x 6 (48)
Rnd 3-6: 48 sc (4 rounds)
Change the yarn to pink color.
Rnd 7: 48 sc (48)
Rnd 8: back loops only: 48 sc
Rnd 9: (6 sc, dec) x 6 (42)
Rnd 10-11: 42 sc (2 rounds)
Rnd 12: (5 sc, dec) x 6 (36)
Rnd 13-14: 36 sc (2 rounds)
Rnd 15: (4 sc, dec) x 6 (30)
Rnd 16-17: 30 sc (2 rounds)
Rnd 18: (3 sc, dec) x 6 (24)
Rnd 19: 24 sc
Rnd 20: (6 sc, dec) x 3 (21)
Stuff the body firmly, especially in the neck.
Cut the pink yarn, we will continue with the head, but first we need to make the dress.
Dress
Attach the pink yarn to back of the body in the front loops left in round 8. Crochet with the body turned upside down:
Rnd 1: (2 dc in one stitch) x 48 (96)
Rnd 2: 96 dc
Fasten off and cut the yarn. Hide the thread inside the body.
Head
Continue corcheting from the body. Change the yarn to white color. Stuff as you go.
Rnd 1: 21 sc
Rnd 2: 21 inc (42)
Rnd 3: (6 sc, inc) x 6 (48)
Rnd 4: (7 sc, inc) x 6 (54)
Rnd 5-9: 54 sc (5 rounds)
Insert the safety eyes between rounds 8 and 9 with 8 stitches between them (6 stitches visible).
Rnd 10: (7 sc, dec) x 6 (48)
Rnd 11-13: 48 sc (3 rounds)
Rnd 14: (6 sc, dec) x 6 (42)
Rnd 15: 42 sc
Rnd 16: (5 sc, dec) x 6 (36)
Rnd 17: (4 sc, dec) x 6 (30)
Rnd 18: (3 sc, dec) x 6 (24)
Rnd 19: (2 sc, dec) x 6 (18)
Rnd 20: (sc, dec) x 6 (12)
Rnd 21: 6 dec (6)
Make sure that the head is stuffed firmly. Close the opening and hide the yarn inside.
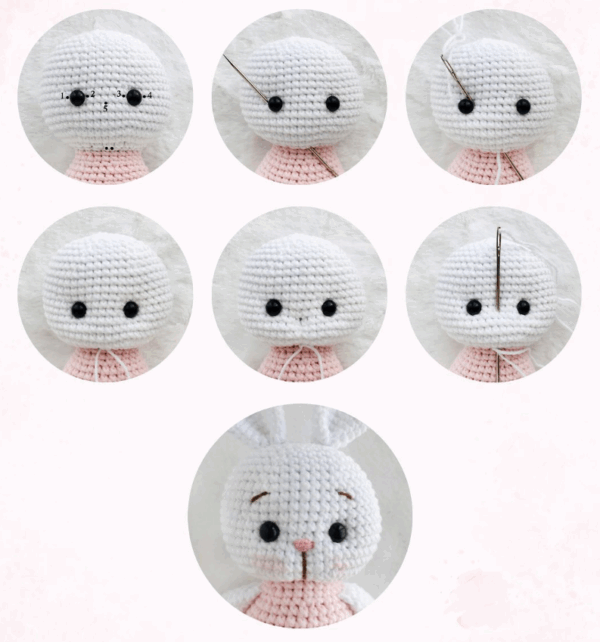
Face Shaping
Pin point 1,2,3,4 and 5. Insert a long, threaded neede through the bottom of the head and bring it out at point 1. Then insert in into point 2 and bring it back out at the bottom of the head. Repeat the same process for the second eye using points 3 and 4. Pull both ends of the thread to shape the eyes and tie a knot to secure.
Next, insert the needle at point 5 and bring it out at the head’s bottom. Pull the thread to form the muzzle. Repeat once more and tie a knot. Hide the thread inside the head.
Using brown thread, embroider the muzzle and eyebrows.
Use pink thread to embroider the nose. Apply a bit of pin blush to the cheeck.
Ears x2
Crochet with the white yarn.
Rnd 1: 6 sc into a magic ring (6)
Rnd 2: 6 inc (12)
Rnd 3: (sc, inc) x 6 (18)
Rnd 4: (2 sc, inc) x 6 (24)
Rnd 5-6: 24 sc (24)
Rnd 7: (6 sc, dec) x 3 (21)
Rnd 8: (5 sc, dec) x 3 (18)
Rnd 9: (4 sc, dec) x 3 (15)
Rnd 10-12: 15 sc (3 rounds)
Fasten off and cut the yarn, leaving a tail for sewing.
Fold the ear in half and sew the ends together.
Sew the ears o nthe top of the head with 4 stitches between them.
