
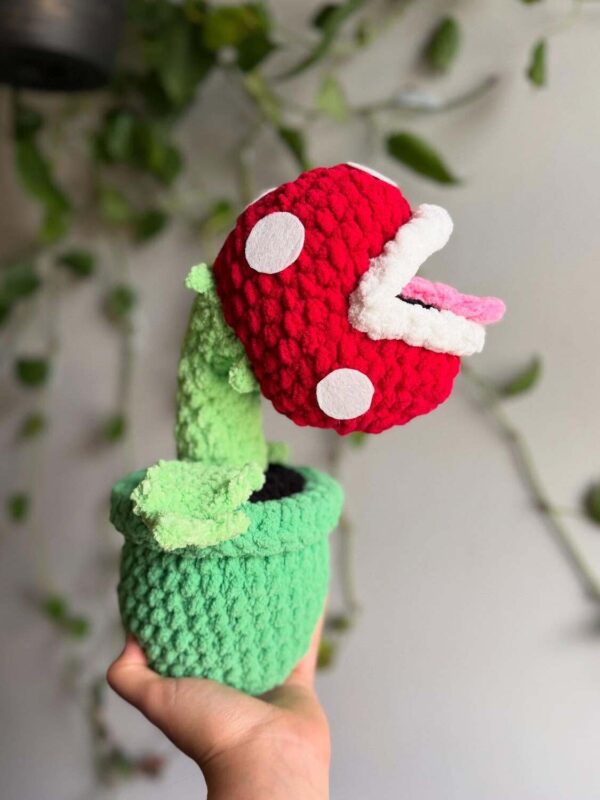
Bring a touch of playful gaming to your home with this champ plant pattern. It’s easy to follow this amigurumi pattern to create a bold, toothy plant with vibrant colors, a sturdy stem, and leafy details.
It’s crafted with any yarn weight you prefer with red, light green, dark green, white, black, pink shades, felt for spots, a suitable hook to the yarn used, stuffing, a bag of beads or sand to be added into the base of the pot.
This tutorial includes how to make the head, the inside mouth piece, outer mouth, pot base, stem, tongue, leaves, spots, also it contains how to assemble all parts.
It’s great for gaming fans, room décor, handmade gifts, desk or shelf displays, collector items, and craft makers.
Designer: CrochetHippyDesigns
Materials
- Yarn you like in colors:
- Red, light green, dark green white, black, pink
- White felt for the spots
- Crochet hook size your prefer
- Stuffing
- Darning Needle
- Scissors
Abbreviations
Mr – magic ring
sc – single crochet
inc – increase
dec – decrease
C/C – color change
F/O – fasten off
BLO – back loops only
sl st – slip stitchh
SK – skip stitch
hdc – half double crochet
dc – double crochet
Picot stitch
Head
In red yarn.
Rnd 1: 8 sc in a Mr (8)
Rnd 2: inc (16)
Rnd 3: (1 sc, inc) x 8 (24)
Rnd 4: (2 sc, inc) x 8 (32)
Rnd 5-8: (4 rounds) sc (32)
Rnd 9: 8 sc – ch 16 and sk 16 stitches – 8 sc (32)
Rnd 10-11: (2 rounds) sc (32)
Rnd 12: (2 sc, dec) x 8 (24)
Rnd 13: (1 sc, dec) x 8 (16)
Rnd 14: dec (8)
F/O leaving long tail to sew closed and hide ends.
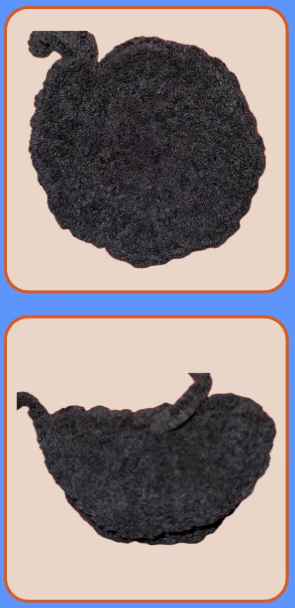
Inside Mouth Piece
Using black yarn.
Rnd 1: 8 sc in a Mr (8)
Rnd 2: inc (16)
Rnd 3: (1 sc, inc) x 8 (24)
Rnd 4: (2 sc, inc) x 8 (32)
Fold mouth piece in half and sl st both sides of the fold together to create an inner mouth crease. Once you get to the end – F/O leaving long tail to sew into head in the next section.
Assembly
At this point now that you have both piece done – you will be sewing the mouth crease inside of the head – once you are almost done sewing in – start to stuff. It is okay if oyur stitch count is off or if you have to sew the same stitch on the mouth piece into multiple stitches of the head. Once you are sewing closed – secure and hide end inside.
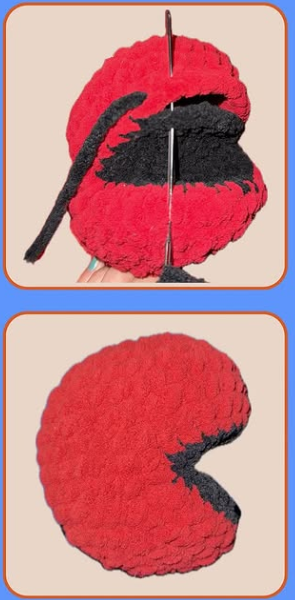
Outer Mouth
For the 2 lips – we will turning the project after R2 – do not ch 1.
Using white yarn.
Rnd 1: ch 16 (16)
Rnd 2: starting from the 2nd ch from the hook: 32 sc – 3 hdc – 3 dc – 3 hdc – 3 sc (15) – turn
Rnd 3: sc (15)
Fold project and sl st both sides together. F/O leaving long enough tail to sew into head in a later section.
Sew each outer lip to both sides of the mouth with the sl st edge facing outward (towards the top and the bottom of the face). Once you are done sewing pieces in, tie together and hide ends.
Pot Base
Using dark green yarn.
Rnd 1: 8 sc in a Mr (8)
Rnd 2: inc (16)
Rnd 3: (1 sc, inc) x 8 (24)
Rnd 4: (2 sc, inc) x 8 (32)
Rnd 5: BLO: sc (32)
Rnd 6-14: (9 rounds) sc (32)
Mark unused BL in R15 – we will be going back to use them in the next section.
Rnd 15: FLO: hdc (32)
Rnd 16: hdc (32)
Rnd 17: sl st (32)
F/O and hide in ends.
Reinsert your hook into the unused back loops of R15 with black yarn and ch 1.
Rnd 1: sc (32)
Rnd 2: dec (16)
Rnd 3: dec (8)
Stuff inside of pot before closing up.
F/O, close the gap and hide ends inside pot base.
Stem
Using light green yarn:
Leave long tail at the start as we will be using that to sew stem into pot base in a later section.
Rnd 1: ch 10 – attach to the first stitch we made with a sc
Rnd 2-11: (10 rounds) sc (10)
Rnd 12: inc (20)
Rnd 13: (sc – sc – hdc – picot – sc – sc) x 4 (20)
F/O leaving long enough tail to secure the stem to both the base and the head.
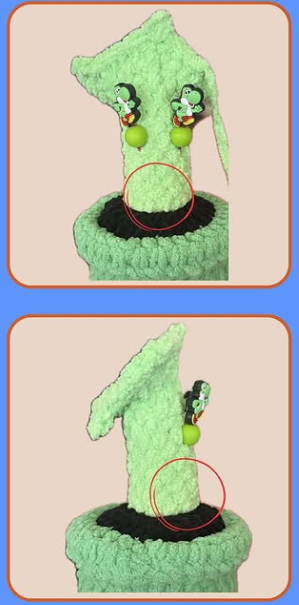
Stem Assembly
- Sew the stem into the center of the pot base – you may to sew a bit in the back to secure and stabilize the stem so it is able to handle the weight of the head once assembled.
- If you are using a blanket yarn you may want to consider using a neck stabilizer like a pool noodle or something similar to help with weight distribution.
Tongue
Using pink yarn: ch 6 and starting from the 2nd ch from the hook – 5 hdc down and F/O leaving long tail to sew into the center of the mouth. You can add ch’s if you would like to have a longer tongue.
Leaves x 2
Using light green yarn: ch 10 and starting from the 2nd ch from the hook – sc – (hdc – picot – hdc) x 3 – (sl st) x 2
On the other side of the ch:
(sl st) x 2 – (hdc – picot – hdc) x 3 – sc
F/O leaving long tail to sew and sew each leaf on either side of the stem once assembled.
Spots x 5
Using white yarn.
Rnd 1: 8 sc in a Mr (8)
Rnd 2: (1 sc, inc) x 4 (12)
sl st on stitch past and F/O leaving lont tail to sew in random spots throughout the head.
Assembly
- Sew the top of the stem into the center back of the head in between R5-6 on either side.
- Sew the bottom of the stem in between R10-11 on either side.
- Once you have your 4 corners secured – go back and secure the rest of the stem base.
- After then – secure ends and hide inside body.
